Netty
第一章 NIO编程
non-blocking io 非阻塞IO
1.1 三大组件
一、Channel & Buffer
channel有点类似于stream,它就是读写数据的双向通道,可以从channel将数据读入buffer,也可以将buffer的数据写入channel,而之前的stream要么是输入,要么是输出,channel比stream更为底层。

常见的Channel有
- FileChannel
- DatagramChannel
- SocketChannel
- ServerSocketChannel
buffer则用来缓冲读写数据,常见的buffer有
- ByteBuffer
- MappedByteBuffer
- DirectByteBuffer
- HeapByteBuffer
- ShortBuffer
- IntBuffer
- LongBuffer
- FloatBuffer
- DoubleBuffer
- CharBuffer
二、Selector 选择器
多线程版设计
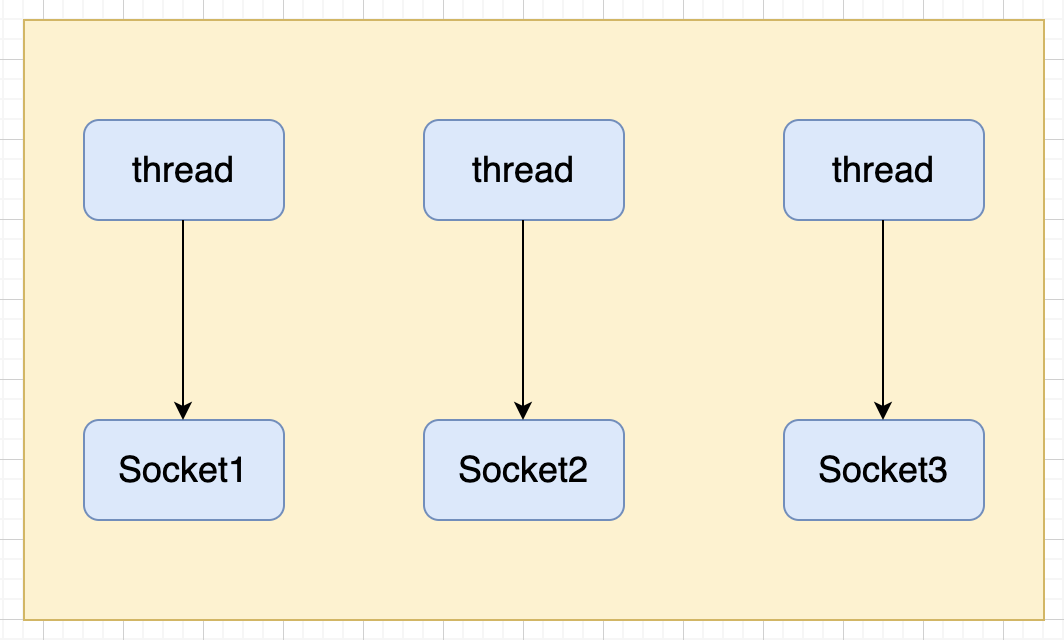
缺点
- 内存占用高
- 线程上下文切换成本高
- 只适合连接数少的场景
线程池版设计
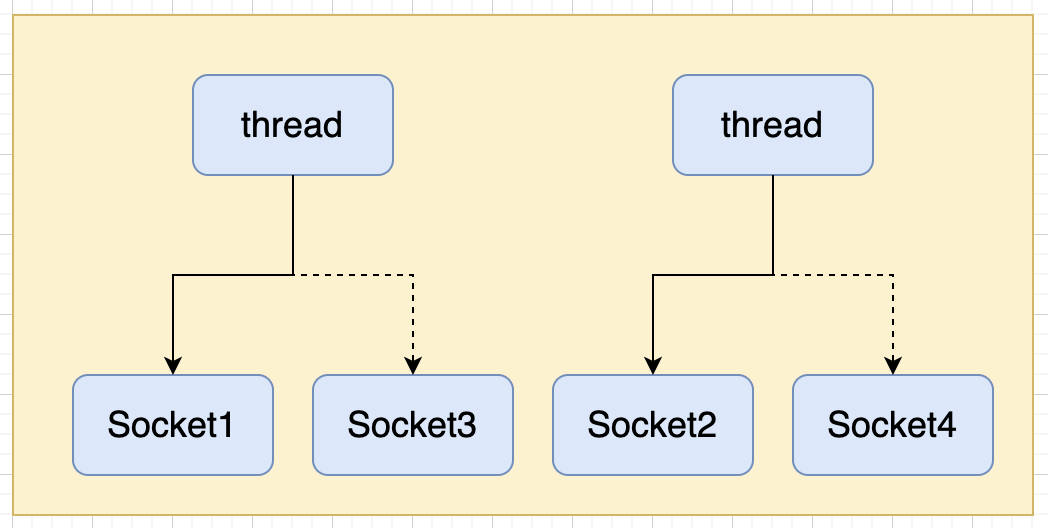
缺点
- 阻塞模式下,线程仅能处理一个socket连接
- 仅适合短连接场景
selector版设计
selector的作用就是配合一个线程来管理多个channel,获取这些channel上发生的事件,这些channel工作在非阻塞模式下,不会让线程在一个channel上,适合连接数特别多,但流量低的场景(low traffic)
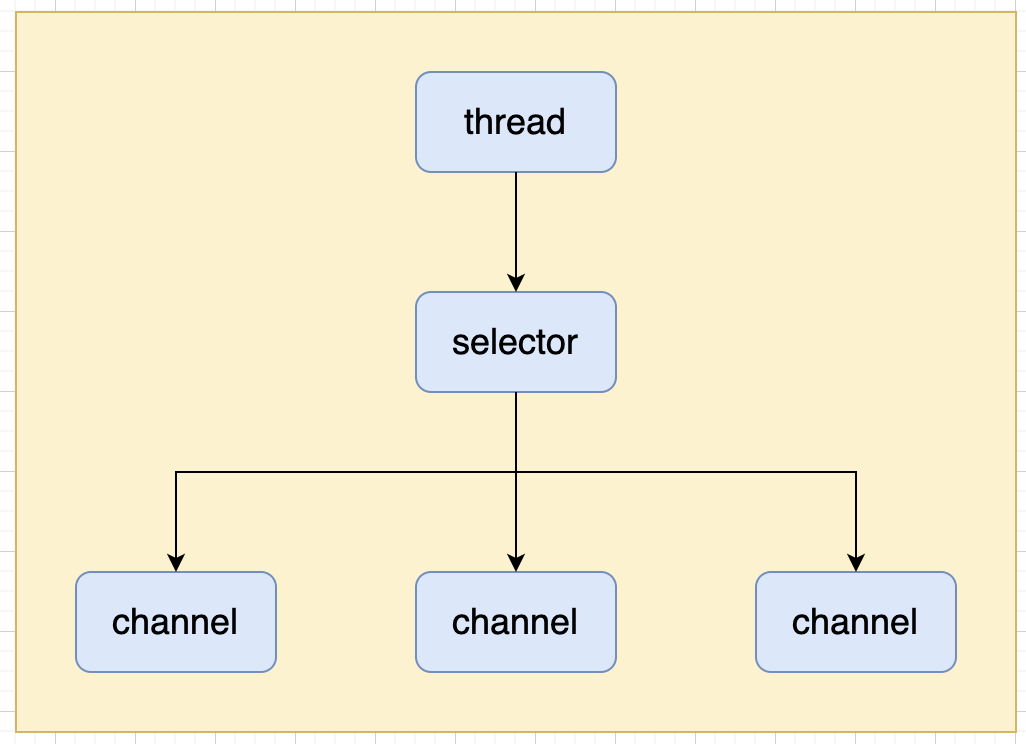
调用selector的select()会阻塞直到channel发生了读写就绪事件,这些事件发生,select方法就会返回这些事件交给thread来处理
1.2 ByteBuffer
一、ByteBuffer使用
- 向buffer写入数据,例如调用channel.read(buffer)
- 调用flip()切换至读模式
- 从buffer读取数据,例如调用buffer.get()
- 调用clear()或compact()切换至写模式
- 重复1~4步骤
import lombok.extern.slf4j.Slf4j;
import java.io.FileInputStream;
import java.io.IOException;
import java.nio.ByteBuffer;
import java.nio.channels.FileChannel;
@Slf4j
public class TestByteBuffer {
public static void main(String[] args) {
try (FileChannel channel = new FileInputStream("data.txt").getChannel()) {
ByteBuffer buffer = ByteBuffer.allocate(10);
while (true) {
int len = channel.read(buffer);
log.debug("读取到的字节 {}", len);
if (len == -1) {
break;
}
buffer.flip();
while (buffer.hasRemaining()) {
byte b = buffer.get();
System.out.print((char) b);
log.debug("实际字节 {}", (char) b);
}
buffer.clear();
}
} catch (IOException e) {
}
}
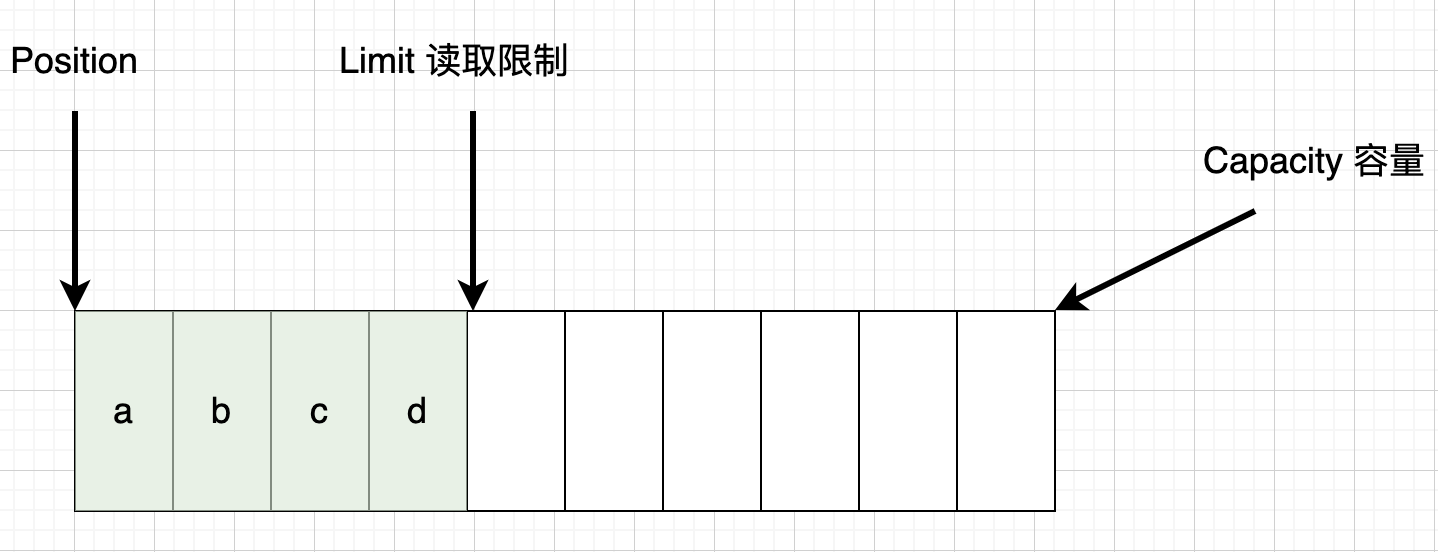
}二、 ByteBuffer结构
ByteBuffer有以下重要属性
- capacity
- position
- limit
开始
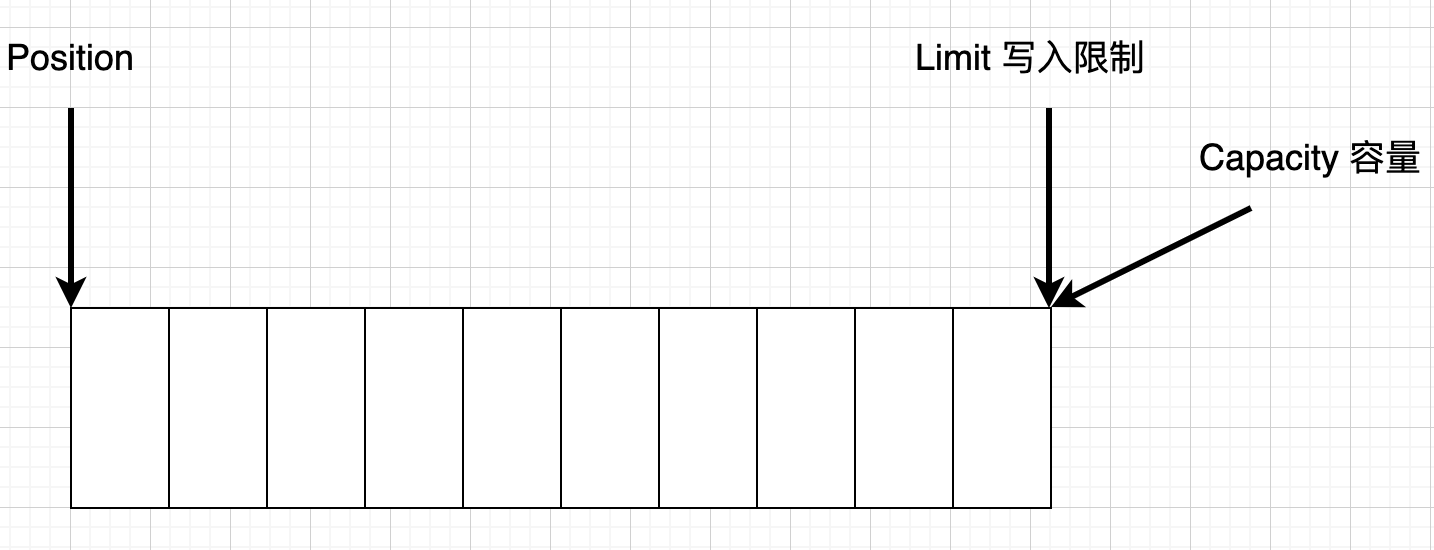
写模式下,position是写入位置,limit等于容量,下图表示写入了4个字节后的状态

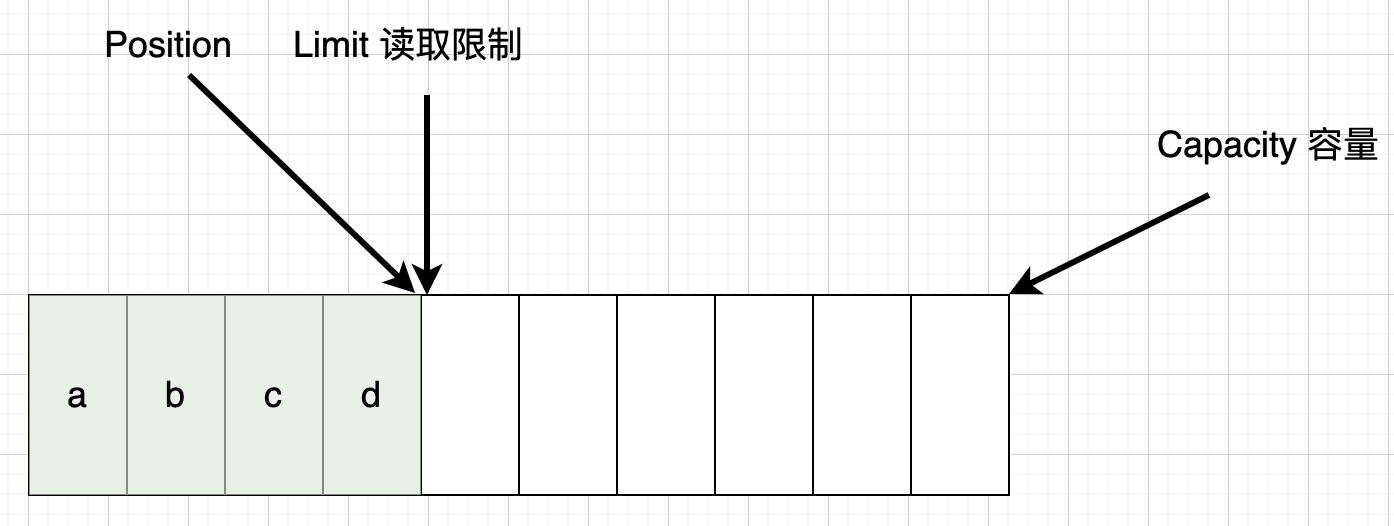
flip动作发生后,position切换为读取位置,limit切换为读取限制
读取4个字节后,状态
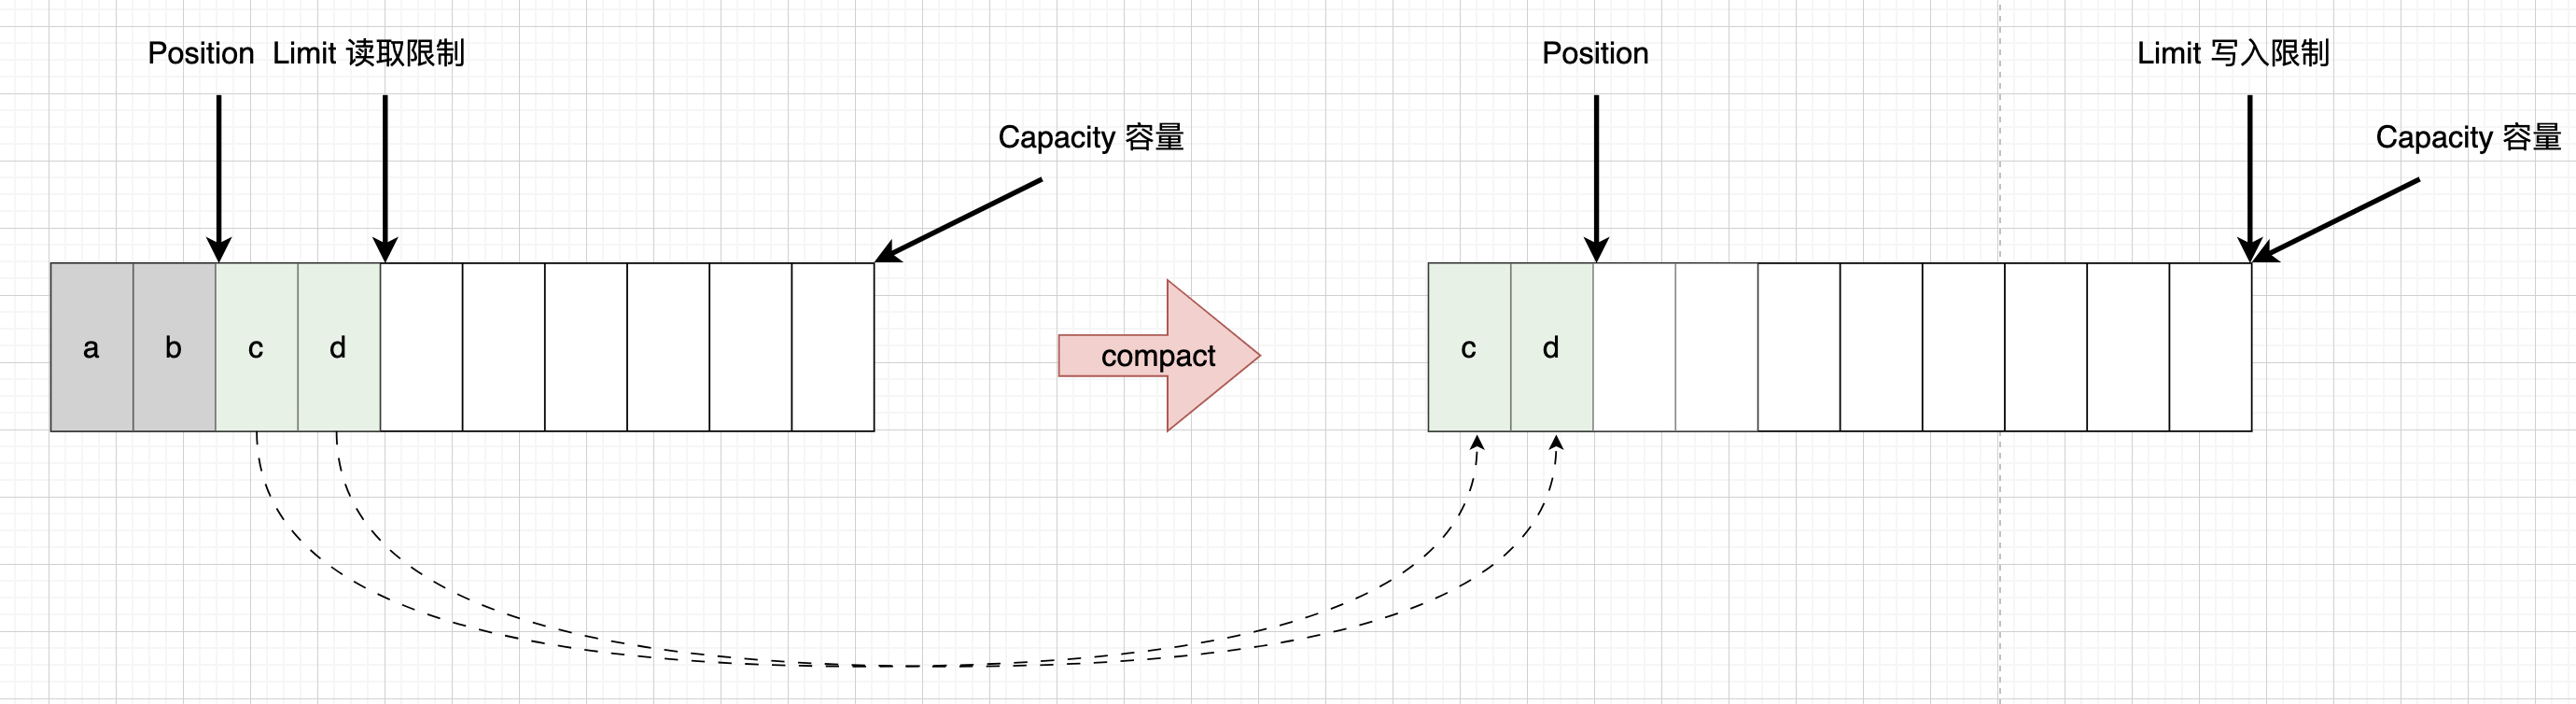
clear动作发生后,状态
compact方法,是把未读完的部分向前压缩,然后切换至写模式
三、ByteBuffer常见方法
分配空间
可以使用allocate方法为ByteBuffer分配空间,其他buffer类也有该方法
ByteBuffer buf = ByteBuffer.allocate(16);

ByteBuffer.allocate(16).getClass(); // class java.nio.HeapByteBuffer						java堆内存, 读写效率较低, 受到 GC 影响
ByteBuffer.allocateDirect(16).getClass(); // class java.nio.DirectByteBuffer		直接内存, 读写效率高(少一次数据拷贝),
																																						 // 不会受到 GC 影响, 分配的效率低, 使用不当会造成内存泄露
向buffer写入数据
- 调用channel的read方法
- 调用buffer自己的put方法
int readBytes = channel.read(buf);

buf.put((byte)127);
从buffer读取数据
- 调用channel的write方法
- 调用buffer自己的get方法
int writeBytes = channel.write(buf);

byte b = buf.get();
get方法会让position读指针向后走,如果想重复读取数据
- 可以调用rewind方法将position重新置为0
- 或者调用get(int i)方法获取索引i的内容,它不会移动读指针
mark & reset
mark做一个标记,记录position位置,reset是将position重置到mark的位置
字符串与ByteBuffer互转
// 1.字符串转为ByteBuffer
ByteBuffer buffer1 = ByteBuffer.allocate(16);
buffer1.put("hello".getBytes());

// 2.Charset
ByteBuffer buffer2 = StandardCharsets.UTF_8.encode("hello");

// 3.wrap
ByteBuffer buffer3 = ByteBuffer.wrap("hello".getBytes());

// 4.转为字符串
String str1 = StandardCharsets.UTF_8.decode(buffer2).toString();
System.out.println(str1);

buffer1.flip();
String str2 = StandardCharsets.UTF_8.decode(buffer1).toString();
System.out.println(str2);
四、Scattering Reads
分散读取
import lombok.extern.slf4j.Slf4j;

import java.io.IOException;
import java.io.RandomAccessFile;
import java.nio.ByteBuffer;
import java.nio.channels.FileChannel;

@Slf4j
public class TestScatteringReads {
    public static void main(String[] args) {
        try (FileChannel channel = new RandomAccessFile("words.txt", "r").getChannel()) {
            ByteBuffer b1 = ByteBuffer.allocate(3);
            ByteBuffer b2 = ByteBuffer.allocate(3);
            ByteBuffer b3 = ByteBuffer.allocate(5);
            ByteBuffer[] byteBuffers = {b1, b2, b3};
            channel.read(byteBuffers);
            b1.flip();
            b2.flip();
            b3.flip();
            while (b1.hasRemaining()) {
                System.out.print((char) b1.get());//one
            }

            System.out.println();
            while (b2.hasRemaining()) {
                System.out.print((char) b2.get());//two
            }

            System.out.println();
            while (b3.hasRemaining()) {
                System.out.print((char) b3.get());//three
            }
        } catch (IOException e) {
        }
    }
}onetwothree五、Gathering Writes
集中写入
import java.io.IOException;
import java.io.RandomAccessFile;
import java.nio.ByteBuffer;
import java.nio.channels.FileChannel;
import java.nio.charset.StandardCharsets;

public class TestGatheringWrites {
    public static void main(String[] args) {
        ByteBuffer b1 = StandardCharsets.UTF_8.encode("hello");
        ByteBuffer b2 = StandardCharsets.UTF_8.encode("world");
        ByteBuffer b3 = StandardCharsets.UTF_8.encode("你好");

        try (FileChannel channel = new RandomAccessFile("words2.txt", "rw").getChannel()) {
            channel.write(new ByteBuffer[]{b1, b2, b3});
        } catch (IOException e) {
        }
    }
}helloworld你好六、黏包和半包
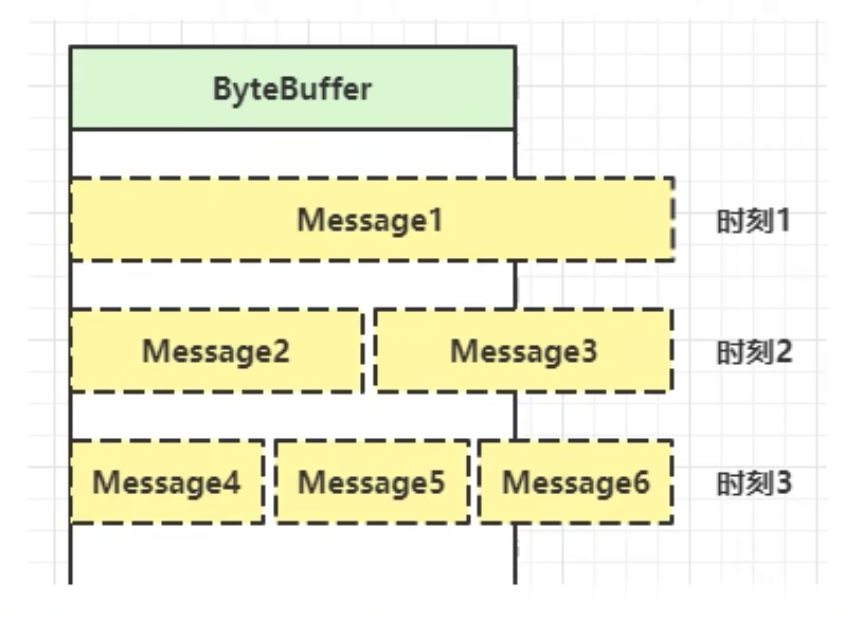
网络上有多条数据发送给服务器,数据之间使用 \n进行分隔
但由于某种原因 这些数据在接收时,被进行了重新组合,例如原始数据有3条为
	Hello,world\n
	I'm zhangsan\n
	How are you?\n
变成了下面的两个 byteBuffer (黏包、半包)
	Hello,world\nI'm zhangsan\nHo
	w are you?\n
import java.nio.ByteBuffer;
public class TestByteBufferExam {
public static void main(String[] args) {
ByteBuffer source = ByteBuffer.allocate(32);
source.put("Hello,world\nI'm zhangsan\nHo".getBytes());
split(source);
source.put("w are you?\n".getBytes());
split(source);
}
private static void split(ByteBuffer source) {
source.flip();
for (int i = 0; i < source.limit(); i++) {
if (source.get(i) == '\n'){
int length = i + 1 - source.position();
ByteBuffer target = ByteBuffer.allocate(length);
for (int j = 0; j < length; j++) {
target.put(source.get());
}
target.flip();
while (target.hasRemaining()) {
System.out.print((char) target.get());
// Hello,world
// I'm zhangsan
// How are you?
}
}
}
source.compact();
}
}1.3 文件编程
一、FileChannel
- FileChannel只能工作在阻塞模式下
获取
不能直接打开FileChannel,必须通过FileInputStream、FileOutputStream或者RandomAccessFile来获取FileChannel,它们都有getChannel方法
- 通过FileInputStream获取的channel只能读
- 通过FileOutputStream获取的channel只能写
- 通过RandomAccessFile是否能读写根据构造RandomAccessFile时的读写模式决定
读取
会从channel读取数据填充ByteBuffer,返回值表示读到了多少字节,-1表示到达了文件的末尾
int readBytes = channel.read(buffer);写入
ByteBuffer buffer = ...;
buffer.put(...);// 存入数据
buffer.flip(); // 切换读模式

while(buffer.hasRemaining) {
  channel.write(buffer);
}
在while中调用channel.write是因为write方法并不能保证一次将buffer中的内容全部写入channel
关闭
channel必须关闭,不过调用了FileInputStream、FileOutputStream或者RandomAccessFile的close方法会简介地调用channel的close方法
位置
// 获取当前位置
long pos = channel.position();

// 设置当前位置
long newPos = ...;
channel.position(newPos);
设置当前位置时,如果设置为文件的末尾
- 这时读取会返回-1
- 这时写入,会追加内容,但要注意如果position超过了文件末尾,再写入时,在新内容和原末尾之间会有空洞(00)
大小
使用size方法获取文件的大小
强制写入
操作系统出于性能的考虑,会将数据缓存,不立刻写入磁盘,可以**调用force(true)**方法,将文件内容和元数据(文件的权限等信息)立刻写入磁盘
二、两个Channel传输数据
import java.io.FileInputStream;
import java.io.FileOutputStream;
import java.io.IOException;
import java.nio.channels.FileChannel;

public class TestFileChannelTransferTo {
    public static void main(String[] args) {
        try (
                FileChannel from = new FileInputStream("data.txt").getChannel();
                FileChannel to = new FileOutputStream("to.txt").getChannel()
        ) {
            // 效率高,底层会利用操作系统等零拷贝进行优化,一次最多传2g数据(可以多次传输)
            from.transferTo(0, from.size(), to);
        } catch (IOException e) {
            e.printStackTrace();
        }
    }
}
import java.io.FileInputStream;
import java.io.FileOutputStream;
import java.io.IOException;
import java.nio.channels.FileChannel;
// 优化版本
public class TestFileChannelTransferTo {
public static void main(String[] args) {
try (
FileChannel from = new FileInputStream("data.txt").getChannel();
FileChannel to = new FileOutputStream("to.txt").getChannel()
) {
long size = from.size();
for (long left = size; left > 0;) {
left -= from.transferTo((size - left), left, to);
}
} catch (IOException e) {
e.printStackTrace();
}
}
}三、Path
jdk7引入了Path和Paths类
- Path用来表示文件路径
- Paths是工具类,用来获取Path实例
Path source = Paths.get("1.txt"); // 相对路径 使用user.dir 环境变量来定位 1.txt

Path source = Paths.get("d:\\1.txt"); // 绝对路径 代表了 d:\1.txt

Path source = Paths.get("d:/1.txt"); // 绝对路径 同样代表了 d:\1.txt

Path source = Paths.get("d:\\data", "projects"); // 代表了 d:\data\projects.代表了当前路径..代表了上一级路径
例如目录结构如下
d:
		|- data
			|- projects
				|- a
				|- b
代码
Path path = Paths.get("d:\\data\\projects\\a\\..\\b");
System.out.println(path);
System.out.println(path.normalize()); // 正常化路径

// d:\data\projects\a\..\b
// d:\data\projects\b
四、Files
检查文件是否存在
Path path = Paths.get("helloword/data.txt");
System.out.println(Files.exists(path));
创建一级目录
Path path = Paths.get("helloword/d1");
Files.createDirectory(path);- 如果目录已存在,会抛异常FileAlreadyExistsException
- 不能一次创建多级目录,否则会抛异常NoSuchFileException
创建多级目录
Path path = Paths.get("helloword/d1/d2");
Files.createDirectory(path);
拷贝文件
Path source = Paths.get("helloword/data.txt");
Path target = Paths.get("helloword/target.txt");

Files.copy(source, target);- 如果文件已存在,会抛异常FileAlreadyExistsException
如果希望用source覆盖掉target,需要用StandardCopyOption来控制
Files.copy(source, target, StandardCopyOption.REPLACE_EXISTING);移动文件
Path source = Paths.get("helloword/data.txt");
Path target = Paths.get("helloword/data.txt");

Files.move(source, target, StandardCopyOption.ATOMIC_MOVE);- StandardCopyOption.ATOMIC_MOVE 保护文件移动的原子性
删除文件
Path target = Paths.get("helloword/target.txt");

Files.delete(target);- 如果文件不存在,会抛异常 NoSuchFileException
删除目录
Path target = Paths.get("helloword/d1");

Files.delete(target);- 如果目录还有内容,会抛异常DirectoryNotEmptyException
walkFileTree 遍历文件夹
import java.io.IOException;
import java.nio.file.*;
import java.nio.file.attribute.BasicFileAttributes;
import java.util.concurrent.atomic.AtomicInteger;

public class TestFilesWalkFileTree {
    public static void main(String[] args) throws IOException {
        AtomicInteger dirCount = new AtomicInteger();
        AtomicInteger fileCount = new AtomicInteger();
        Files.walkFileTree(Paths.get("/Users/test/IdeaProjects/shantianqi"), new SimpleFileVisitor<>() {
            @Override
            public FileVisitResult preVisitDirectory(Path dir, BasicFileAttributes attrs) throws IOException {
                System.out.println("====>" + dir);
                dirCount.incrementAndGet();
                return super.preVisitDirectory(dir, attrs);
            }

            @Override
            public FileVisitResult visitFile(Path file, BasicFileAttributes attrs) throws IOException {
                System.out.println(file);
                fileCount.incrementAndGet();
                return super.visitFile(file, attrs);
            }
        });
        System.out.println("dirCount:" + dirCount);
        System.out.println("fileCount:" + fileCount);
    }
}
批量删除:可以在postVisitDirectory中进行
多级目录拷贝
import java.io.IOException;
import java.nio.file.Files;
import java.nio.file.Paths;

public class TestFilesCopy {
    public static void main(String[] args) throws IOException {
        String source = "";
        String target = "";

        Files.walk(Paths.get(source)).forEach(path -> {
            try {
                String targetName = path.toString().replace(source, target);
                // 目录
                if (Files.isDirectory(path)) {
                    Files.createDirectories(Paths.get(targetName));
                }
                // 普通文件
                else if (Files.isRegularFile(path)) {
                    Files.copy(path, Paths.get(targetName));
                }
            } catch (IOException e) {
                e.printStackTrace();
            }
        });
    }
}
1.4 网络编程
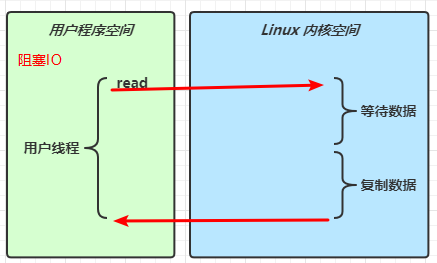
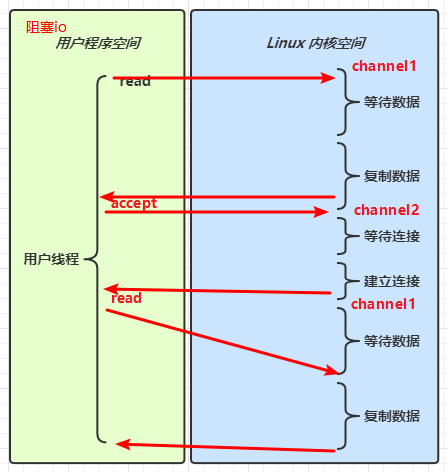
一、阻塞 && 非阻塞
阻塞
- 在没有数据可读时,包括数据复制过程中,线程必须阻塞等待,不会占用cpu,但线程相当于闲置
- 32位jvm一个线程320k,64位jvm一个线程1024k,为了减少线程数,需要采取线程池技术
- 但即便用了线程池,如果有很多连接建立,但长时间inactive,会阻塞线程池中所有线程
import java.io.IOException;
import java.net.InetSocketAddress;
import java.nio.ByteBuffer;
import java.nio.channels.ServerSocketChannel;
import java.nio.channels.SocketChannel;
import java.util.ArrayList;
import java.util.List;
import lombok.extern.slf4j.Slf4j;

@Slf4j
public class Server {
    public static void main(String[] args) throws IOException {
        // 使用nio来理解阻塞模式,单线程
        // 1.ByteBuffer
        ByteBuffer buffer = ByteBuffer.allocate(16);
        // 2.创建了服务器
        ServerSocketChannel ssc = ServerSocketChannel.open();
        // 3.绑定监听端口
        ssc.bind(new InetSocketAddress(8080));
        // 4.连接集合
        List<SocketChannel> channels = new ArrayList<>();

        while (true) {
            // 5.accept建立与客户端连接,SocketChannel 用来与客户端之间通信
            log.debug("connecting...");
            SocketChannel sc = ssc.accept(); // 阻塞方法,没有通道建立时,线程停止运行
            log.debug("connected... {}", sc);
            channels.add(sc);
            for (SocketChannel channel : channels) {
                // 6.接收客户端发送的数据
                log.debug("before read... {}", channel);
                channel.read(buffer);// 阻塞方法,没有数据读取时,线程停止运行
                buffer.flip();
                buffer.clear();
                log.debug("after read... {}", channel);
            }
        }
    }
}
import java.io.IOException;
import java.net.InetSocketAddress;
import java.nio.channels.SocketChannel;
public class Client {
public static void main(String[] args) throws IOException {
SocketChannel sc = SocketChannel.open();
sc.connect(new InetSocketAddress("localhost", 8080));
System.out.println("waiting...");
}
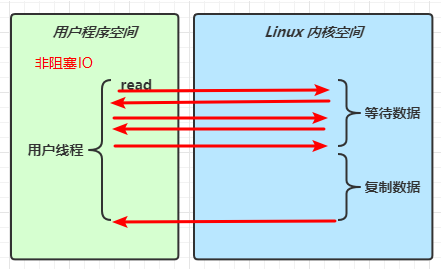
}非阻塞
- 在某个Channel没有可读事件时,线程不必阻塞,它可以去处理其他有可读事件的Channel
- 数据复制过程中,线程实际还是阻塞的(AIO改进的地方)
- 写数据时,线程只是等待数据写入Channel即可,无需等待Channel通过网络把数据发送出去
import lombok.extern.slf4j.Slf4j;
import java.io.IOException;
import java.net.InetSocketAddress;
import java.nio.ByteBuffer;
import java.nio.channels.ServerSocketChannel;
import java.nio.channels.SocketChannel;
import java.util.ArrayList;
import java.util.List;
@Slf4j
public class ServerNoBlocking {
public static void main(String[] args) throws IOException {
// 1.ByteBuffer
ByteBuffer buffer = ByteBuffer.allocate(16);
// 2.创建了服务器
ServerSocketChannel ssc = ServerSocketChannel.open();
// 3.绑定监听端口
ssc.bind(new InetSocketAddress(8080));
ssc.configureBlocking(false); //非阻塞模式
// 4.连接集合
List<SocketChannel> channels = new ArrayList<>();
while (true) {
// 5.accept建立与客户端连接,SocketChannel 用来与客户端之间通信
SocketChannel sc = ssc.accept(); // 非阻塞,线程还会继续运行,如果没有连接建立,sc为null
if (sc != null) {
log.debug("connected... {}", sc);
sc.configureBlocking(false); //非阻塞模式
channels.add(sc);
}
for (SocketChannel channel : channels) {
// 6.接收客户端发送的数据
int read = channel.read(buffer);// 非阻塞,线程继续运行,如果没有读到数据,read返回0
if (read > 0) {
buffer.flip();
buffer.clear();
log.debug("after read... {}", channel);
}
}
}
}
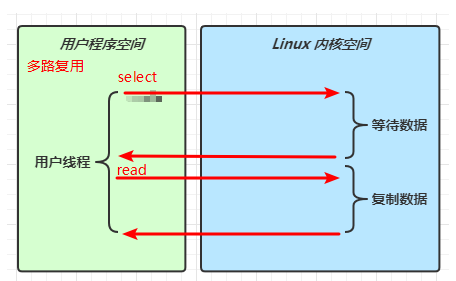
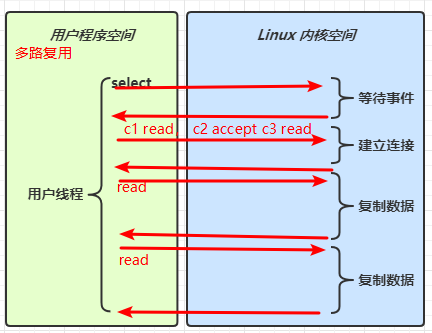
}多路复用
线程必须配合Selector才能完成对多个Channel可读写事件的监控,这称之为多路复用
- 多路复用仅针对网络IO/普通文件IO没法利用多路复用
- 如果不用Selector的非阻塞模式,那么Channel读取到的字节很多时候都是0,而Selector保证了有可读事件才去读取
- Channel输入的数据一旦准备好,会触发Selector的可读事件
二、Selector
好处
- 一个线程配合selector就可以监控多个channel事件,事件发生线程才去处理,避免非阻塞模式下所做无用功
- 让这个线程能够被充分利用
- 节约了线程的数量
- 减少了上下文切换
创建
Selector selector = Selector.open();绑定channel事件
注册事件,绑定的事件selector才会关心
channel.configureBlocking(false);
SelectionKey key = channel.register(selector, 绑定事件);- channel必须工作在非阻塞模式
- FileChannel没有非阻塞模式,因此不能配合selector一起使用
- 绑定的事件类型可以有
- connect - 客户端连接成功时触发
- accept - 服务器端成功接收连接时触发
- read - 数据可读入时触发,有因为接收能力弱,数据暂时不能读入的情况
- write - 数据可写出时触发,有因为发送能力弱,数据暂时不能写出的情况
监听Channel事件
可以通过下面三种方法监听是否有事件发生,方法的返回值代表有多少channel发生了事件
1、阻塞直到绑定事件发生
int count = selector.select();2、阻塞直到绑定事件发生或超时
int count = selector.select(long timeout);3、不会阻塞,也就是不管有没有事件,立刻返回,自己根据返回值检查是否有事件
int count = selector.selectNow();select 何时不阻塞
- 事件发生时
- 客户端发起连接请求,会触发 accept 事件
- 客户端发送数据过来,客户端正常、异常关闭时,都会触发 read 事件,另外如果发送的数据大于 buffer 缓冲区,会触发多次读取事件
- channel 可写,会触发 write 事件
- 在 linux 下 nio bug 发生时
- 调用 selector.wakeup()
- 调用 selector.close()
- selector 所在线程 interrupt
处理accept和read事件
import lombok.extern.slf4j.Slf4j;

import java.io.IOException;
import java.net.InetSocketAddress;
import java.nio.ByteBuffer;
import java.nio.channels.*;
import java.util.Iterator;

@Slf4j
public class ServerSelector {
    public static void main(String[] args) throws IOException {
        try (ServerSocketChannel channel = ServerSocketChannel.open()) {
            channel.bind(new InetSocketAddress(8080));
            System.out.println(channel);
            Selector selector = Selector.open();
            channel.configureBlocking(false);
            channel.register(selector, SelectionKey.OP_ACCEPT);

            while (true) {
                int count = selector.select();
                log.debug("select count: {}", count);
                // 获取所有事件
                Set<SelectionKey> keys = selector.selectedKeys();

                // 遍历所有事件,逐一处理
                Iterator<SelectionKey> iter = keys.iterator();
                while (iter.hasNext()) {
                    SelectionKey key = iter.next();
                    // 判断事件类型
                    if (key.isAcceptable()) {
                        ServerSocketChannel c = (ServerSocketChannel) key.channel();
                        // 必须处理
                        SocketChannel sc = c.accept();
                        sc.configureBlocking(false);
                        sc.register(selector, SelectionKey.OP_READ);
                        log.debug("连接已建立: {}", sc);
                    } else if (key.isReadable()) {
                        SocketChannel sc = (SocketChannel) key.channel();
                        ByteBuffer buffer = ByteBuffer.allocate(128);
                        int read = sc.read(buffer);
                        if(read == -1) {
                            key.cancel();
                            sc.close();
                        } else {
                            buffer.flip();
                            debug(buffer);
                        }
                    }
                    // 处理完毕,必须将事件移除
                    iter.remove();
                }
            }
        } catch (IOException e) {
            e.printStackTrace();
        }
    }
}为什么要iter.remove()
因为 select 在事件发生后,就会将相关的 key 放入 selectedKeys 集合,但不会在处理完后从 selectedKeys 集合中移除,需要我们自己编码删除。例如
- 第一次触发了 ssckey 上的 accept 事件,没有移除 ssckey
- 第二次触发了 sckey 上的 read 事件,但这时 selectedKeys 中还有上次的 ssckey ,在处理时因为没有真正的 serverSocket 连上了,就会导致空指针异常
cancel的作用
cancel 会取消注册在 selector 上的 channel,并从 keys 集合中删除 key 后续不会再监听事件
处理消息边界
- 一种思路是固定消息长度,数据包大小一样,服务器按预定长度读取,缺点是浪费带宽
- 另一种思路是按分隔符拆分,缺点是效率低
- TLV格式,即Type类型、Length长度、Value数据,类型和长度已知的情况下,就可以方便获取消息大小,分配合适的buffer,缺点是buffer需要提前分配,如果内容过大,则影响server吞吐量
- Http 1.1是TLV格式
- Http 2.0是LTV格式
if (buffer.position() == buffer.limit()) {
    ByteBuffer newBuffer = ByteBuffer.allocate(buffer.capacity() * 2);
    newBuffer.put(buffer);
    key.attach(newBuffer);
}
ByteBuffer大小分配
- 每个channel都需要记录可能被切分的消息,因为ByteBuffer不是线程安全的,因此需要为每个channel维护一个独立的ByteBuffer
- ByteBuffer不能太大,比如一个ByteBuffer 1Mb的话,要支持几百万连接就要1Tb内存,因此需要设计大小可变的ByteBuffer
- 一种思路是首先分配一个较小的buffer,例如4kb,如果发现数据不够,再分配8kb的buffer,将4kb buffer内容拷贝至8kb buffer中,优点是消息连续容易处理,缺点是数据拷贝耗费性能
- 另一种思路是用多个数组组成buffer,一个数组不够,把多出来的内容写入新的数组,与前面的区别是消息存储不连续,解析复杂,优点是避免了拷贝引起的性能损耗
server
import java.io.IOException;
import java.net.InetSocketAddress;
import java.nio.ByteBuffer;
import java.nio.channels.*;
import java.nio.charset.Charset;
import java.util.Iterator;

public class WriteSever {
    public static void main(String[] args) throws IOException {
        ServerSocketChannel ssc = ServerSocketChannel.open();

        ssc.configureBlocking(false);

        Selector selector = Selector.open();
        ssc.register(selector, SelectionKey.OP_ACCEPT);

        ssc.bind(new InetSocketAddress(8080));

        while (true) {
            selector.select();
            Iterator<SelectionKey> iterator = selector.selectedKeys().iterator();
            while (iterator.hasNext()) {
                SelectionKey key = iterator.next();
                iterator.remove();
                if (key.isAcceptable()) {
                    SocketChannel sc = ssc.accept();
                    sc.configureBlocking(false);

                    SelectionKey sckey = sc.register(selector, 0, null);
                    sckey.interestOps(SelectionKey.OP_READ);

                    // 1.向客户端发送大量数据
                    StringBuilder sb = new StringBuilder();
                    for (int i = 0; i < 3000000; i++) {
                        sb.append("a");
                    }

                    ByteBuffer buffer = Charset.defaultCharset().encode(sb.toString());

                    // 2.返回值代表实际写入的字节数
                    int write = sc.write(buffer);
                    System.out.println(write);

                    // 3.判断是否有剩余内容
                    while (buffer.hasRemaining()) {
                        // 4.关注可写事件
                        sckey.interestOps(sckey.interestOps() + SelectionKey.OP_WRITE);
                        // 5.把未写完的数据挂到sckey上
                        sckey.attach(buffer);
                    }
                }
                else if (key.isWritable()) {
                    ByteBuffer buffer = (ByteBuffer)key.attachment();
                    SocketChannel sc = (SocketChannel)key.channel();

                    int write = sc.write(buffer);
                    System.out.println(write);
                    // 6.清理操作
                    if (!buffer.hasRemaining()) {
                        key.attach(null); // 需要清楚buffer
                        key.interestOps(key.interestOps() - SelectionKey.OP_WRITE); // 不需关注可写事件
                    }
                }
            }
        }
    }
}
client
import java.io.IOException;
import java.net.InetSocketAddress;
import java.nio.ByteBuffer;
import java.nio.channels.SocketChannel;

public class WriteClient {
    public static void main(String[] args) throws IOException {
        Selector selector = Selector.open();
        SocketChannel sc = SocketChannel.open();
        sc.configureBlocking(false);
        sc.register(selector, SelectionKey.OP_CONNECT | SelectionKey.OP_READ);
        sc.connect(new InetSocketAddress("localhost", 8080));
        int count = 0;
        while (true) {
            selector.select();
            Iterator<SelectionKey> iter = selector.selectedKeys().iterator();
            while (iter.hasNext()) {
                SelectionKey key = iter.next();
                iter.remove();
                if (key.isConnectable()) {
                    System.out.println(sc.finishConnect());
                } else if (key.isReadable()) {
                    ByteBuffer buffer = ByteBuffer.allocate(1024 * 1024);
                    count += sc.read(buffer);
                    buffer.clear();
                    System.out.println(count);
                }
            }
        }
    }
}
write 为何要取消
只要向 channel 发送数据时,socket 缓冲可写,这个事件会频繁触发,因此应当只在 socket 缓冲区写不下时再关注可写事件,数据写完之后再取消关注
利用多线程优化
分两组选择器
- 单线程配一个选择器,专门处理accept事件
- 创建cpu核心数的线程,每个线程配一个选择器,轮流处理read事件
问题解决 wakeup
import lombok.extern.slf4j.Slf4j;

import java.io.IOException;
import java.net.InetSocketAddress;
import java.nio.ByteBuffer;
import java.nio.channels.*;
import java.util.Iterator;

@Slf4j
public class MultiThreadServer {
    public static void main(String[] args) throws IOException {
        Thread.currentThread().setName("boss");
        ServerSocketChannel ssc = ServerSocketChannel.open();
        ssc.configureBlocking(false);
        Selector boss = Selector.open();
        SelectionKey bossKey = ssc.register(boss, 0, null);
        bossKey.interestOps(SelectionKey.OP_ACCEPT);
        ssc.bind(new InetSocketAddress(8080));
        // 1.创建固定数量的 worker 并初始化
        Worker worker = new Worker("worker-0");

        while (true) {
            boss.select();
            Iterator<SelectionKey> iterator = boss.selectedKeys().iterator();
            while (iterator.hasNext()) {
                SelectionKey key = iterator.next();
                iterator.remove();
                if (key.isAcceptable()) {
                    SocketChannel sc = ssc.accept();
                    sc.configureBlocking(false);
                    log.debug("connected...{}", sc.getRemoteAddress());
                    // 2.关联 selector
                    log.debug("before register...{}", sc.getRemoteAddress());
                    worker.register(sc);
                    // sc.register(worker.selector, SelectionKey.OP_READ, null);
                    log.debug("after register...{}", sc.getRemoteAddress());
                }
            }
        }
    }

    static class Worker implements Runnable {
        private Thread thread;
        private Selector selector;
        private String name;
        private volatile boolean start = false;// 还未初始化
//        private ConcurrentLinkedQueue<Runnable> queue = new ConcurrentLinkedQueue<>();

        public Worker(String name) {
            this.name = name;
        }

        // 初始化线程 和 selector
        public void register(SocketChannel sc) throws IOException {
            if (!start) {
                thread = new Thread(this, name);
                thread.start();
                selector = Selector.open();
                start = true;
            }
            // 向队列添加了任务,但这个任务并没有立刻执行
//            queue.add(() -> {
//                try {
//                    sc.register(selector, SelectionKey.OP_READ, null);
//                } catch (ClosedChannelException e) {
//                    e.printStackTrace();
//                }
//            });
            // 唤醒select方法
            selector.wakeup();
            sc.register(selector, SelectionKey.OP_READ, null);
        }

        @Override
        public void run() {
            while (true) {
                try {
                    selector.select();// worker-0 阻塞,wakeup
//                    Runnable task = queue.poll();
//                    if (task != null) {
//                        task.run();// 执行了 sc.register(worker.selector, SelectionKey.OP_READ, null);
//                    }
                    Iterator<SelectionKey> iterator = selector.selectedKeys().iterator();
                    while (iterator.hasNext()) {
                        SelectionKey key = iterator.next();
                        iterator.remove();
                        if (key.isReadable()) {
                            ByteBuffer buffer = ByteBuffer.allocate(16);
                            SocketChannel sc = (SocketChannel) key.channel();
                            log.debug("read...{}", sc.getRemoteAddress());
                            sc.read(buffer);
                            buffer.flip();
                            while (buffer.hasRemaining()) {
                                System.out.print((char) buffer.get());
                            }
                            sc.close();
                        }
                    }
                }catch (IOException e) {
                    e.printStackTrace();
                }
            }
        }
    }
}
import java.io.IOException;
import java.net.InetSocketAddress;
import java.nio.channels.SocketChannel;
import java.nio.charset.Charset;
public class TestClient {
public static void main(String[] args) throws IOException {
SocketChannel sc = SocketChannel.open();
sc.connect(new InetSocketAddress("localhost", 8080));
sc.write(Charset.defaultCharset().encode("1234567890abcdef"));
System.in.read();
}
}多线程
import lombok.extern.slf4j.Slf4j;

import java.io.IOException;
import java.net.InetSocketAddress;
import java.nio.ByteBuffer;
import java.nio.channels.*;
import java.util.Iterator;
import java.util.concurrent.atomic.AtomicInteger;

@Slf4j
public class MultiThreadServer {
    public static void main(String[] args) throws IOException {
        Thread.currentThread().setName("boss");
        ServerSocketChannel ssc = ServerSocketChannel.open();
        ssc.configureBlocking(false);
        Selector boss = Selector.open();
        SelectionKey bossKey = ssc.register(boss, 0, null);
        bossKey.interestOps(SelectionKey.OP_ACCEPT);
        ssc.bind(new InetSocketAddress(8080));
        // 1.创建固定数量的 worker 并初始化
        Worker[] workers = new Worker[Runtime.getRuntime().availableProcessors()];
        for (int i = 0; i < workers.length; i++) {
            workers[i] = new Worker("worker-" + i);
        }
        AtomicInteger index = new AtomicInteger();
        while (true) {
            boss.select();
            Iterator<SelectionKey> iterator = boss.selectedKeys().iterator();
            while (iterator.hasNext()) {
                SelectionKey key = iterator.next();
                iterator.remove();
                if (key.isAcceptable()) {
                    SocketChannel sc = ssc.accept();
                    sc.configureBlocking(false);
                    log.debug("connected...{}", sc.getRemoteAddress());
                    // 2.关联 selector
                    log.debug("before register...{}", sc.getRemoteAddress());
                    // round-robin 轮询
                    workers[index.getAndIncrement() % workers.length].register(sc);
                    log.debug("after register...{}", sc.getRemoteAddress());
                }
            }
        }
    }

    static class Worker implements Runnable {
        private Thread thread;
        private Selector selector;
        private String name;
        private volatile boolean start = false;// 还未初始化

        public Worker(String name) {
            this.name = name;
        }

        // 初始化线程 和 selector
        public void register(SocketChannel sc) throws IOException {
            if (!start) {
                thread = new Thread(this, name);
                thread.start();
                selector = Selector.open();
                start = true;
            }
            // 唤醒select方法
            selector.wakeup();
            sc.register(selector, SelectionKey.OP_READ, null);
        }

        @Override
        public void run() {
            while (true) {
                try {
                    selector.select();// worker-0 阻塞,wakeup
                    Iterator<SelectionKey> iterator = selector.selectedKeys().iterator();
                    while (iterator.hasNext()) {
                        SelectionKey key = iterator.next();
                        iterator.remove();
                        if (key.isReadable()) {
                            ByteBuffer buffer = ByteBuffer.allocate(16);
                            SocketChannel sc = (SocketChannel) key.channel();
                            log.debug("read...{}", sc.getRemoteAddress());
                            sc.read(buffer);
                            buffer.flip();
                            while (buffer.hasRemaining()) {
                                System.out.print((char) buffer.get());
                            }
                            sc.close();
                        }
                    }
                }catch (IOException e) {
                    e.printStackTrace();
                }
            }
        }
    }
}
获取CPU个数
- Runtime.getRuntime().availableProcessors() 如果工作在 docker 容器下,因为容器不是物理隔离的,会拿到物理 cpu 个数,而不是容器申请时的个数
- 这个问题直到 jdk 10 才修复,使用 jvm 参数 UseContainerSupport 配置, 默认开启
三、UDP
- UDP 是无连接的,client 发送数据不会管 server 是否开启
- server 这边的 receive 方法会将接收到的数据存入 byte buffer,但如果数据报文超过 buffer 大小,多出来的数据会被默默抛弃
首先启动服务器端
public class UdpServer {
    public static void main(String[] args) {
        try (DatagramChannel channel = DatagramChannel.open()) {
            channel.socket().bind(new InetSocketAddress(9999));
            System.out.println("waiting...");
            ByteBuffer buffer = ByteBuffer.allocate(32);
            channel.receive(buffer);
            buffer.flip();
          	while (buffer.hasRemaining()) {
               System.out.print((char) buffer.get());
            }
        } catch (IOException e) {
            e.printStackTrace();
        }
    }
}
输出
waiting...运行客户端
public class UdpClient {
    public static void main(String[] args) {
        try (DatagramChannel channel = DatagramChannel.open()) {
            ByteBuffer buffer = StandardCharsets.UTF_8.encode("hello");
            InetSocketAddress address = new InetSocketAddress("localhost", 9999);
            channel.send(buffer, address);
        } catch (Exception e) {
            e.printStackTrace();
        }
    }
}
接下来服务器端输出
hello1.5 NIO vs BIO
一、stream vs channel
- stream不会自动缓冲数据,channel会利用系统提供的发送缓冲区、接收缓冲区(更为底层)
- stream仅支持阻塞API,channel同时支持阻塞、非阻塞API,网络channel可配合selector实现多路复用
- 二者均为全双工,即读写可以同时进行
二、IO模型
同步阻塞,同步非阻塞,多路复用,异步阻塞(没有此情况),异步非阻塞
- 同步:线程自己去获取结果(一个线程)
- 异步:线程自己不去获取结果,而是由其他线程送结果(至少两个线程)
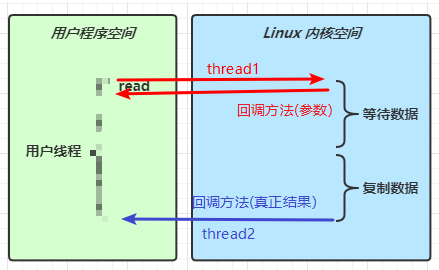
当调用一次channel.read或stream.read后,会切换至操作系统内核态来完成真正数据读取,而读取又分为两个阶段,分别为:
- 等待数据阶段
- 复制数据阶段
阻塞IO
非阻塞IO
多路复用
信号驱动(略)
异步 IO
阻塞 IO vs 多路复用
三、零拷贝
传统IO问题
传统的 IO 将一个文件通过 socket 写出
File f = new File("helloword/data.txt");
RandomAccessFile file = new RandomAccessFile(file, "r");
byte[] buf = new byte[(int)f.length()];
file.read(buf);
Socket socket = ...;
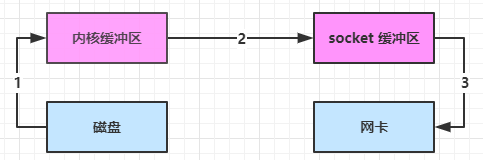
socket.getOutputStream().write(buf);内部工作流程是这样的:
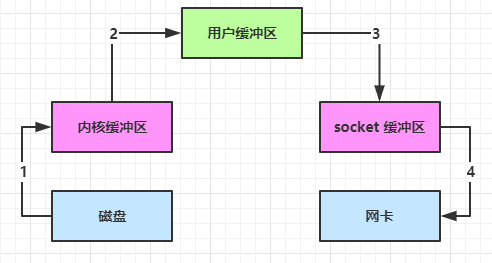
java 本身并不具备 IO 读写能力,因此 read 方法调用后,要从 java 程序的用户态切换至内核态,去调用操作系统(Kernel)的读能力,将数据读入内核缓冲区。这期间用户线程阻塞,操作系统使用 DMA(Direct Memory Access)来实现文件读,其间也不会使用 cpu
DMA 也可以理解为硬件单元,用来解放 cpu 完成文件 IO
从内核态切换回用户态,将数据从内核缓冲区读入用户缓冲区(即 byte[] buf),这期间 cpu 会参与拷贝,无法利用 DMA
调用 write 方法,这时将数据从用户缓冲区(byte[] buf)写入 socket 缓冲区,cpu 会参与拷贝
接下来要向网卡写数据,这项能力 java 又不具备,因此又得从用户态切换至内核态,调用操作系统的写能力,使用 DMA 将 socket 缓冲区的数据写入网卡,不会使用 cpu
可以看到中间环节较多,java 的 IO 实际不是物理设备级别的读写,而是缓存的复制,底层的真正读写是操作系统来完成的
- 用户态与内核态的切换发生了 3 次,这个操作比较重量级
- 数据拷贝了共 4 次
NIO优化
通过 DirectByteBuf
- ByteBuffer.allocate(10) HeapByteBuffer 使用的还是 java 内存
- ByteBuffer.allocateDirect(10) DirectByteBuffer 使用的是操作系统内存
大部分步骤与优化前相同,不再赘述。唯有一点:java 可以使用 DirectByteBuf 将堆外内存映射到 jvm 内存中来直接访问使用
- 这块内存不受 jvm 垃圾回收的影响,因此内存地址固定,有助于 IO 读写
- java 中的 DirectByteBuf 对象仅维护了此内存的虚引用,内存回收分成两步
- DirectByteBuf 对象被垃圾回收,将虚引用加入引用队列
- 通过专门线程访问引用队列,根据虚引用释放堆外内存
- 减少了一次数据拷贝,用户态与内核态的切换次数没有减少
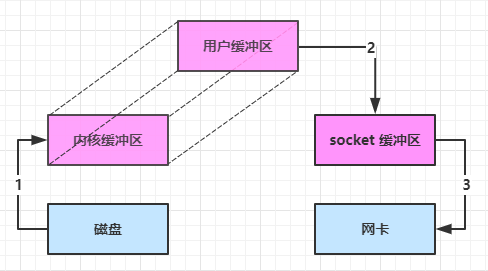
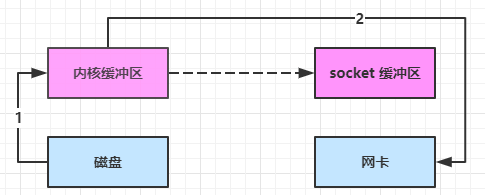
进一步优化(底层采用了 linux 2.1 后提供的 sendFile 方法),java 中对应着两个 channel 调用 transferTo/transferFrom 方法拷贝数据
- java 调用 transferTo 方法后,要从 java 程序的用户态切换至内核态,使用 DMA将数据读入内核缓冲区,不会使用 cpu
- 数据从内核缓冲区传输到 socket 缓冲区,cpu 会参与拷贝
- 最后使用 DMA 将 socket 缓冲区的数据写入网卡,不会使用 cpu
可以看到
- 只发生了一次用户态与内核态的切换
- 数据拷贝了 3 次
进一步优化(linux 2.4)
- java 调用 transferTo 方法后,要从 java 程序的用户态切换至内核态,使用 DMA将数据读入内核缓冲区,不会使用 cpu
- 只会将一些 offset 和 length 信息拷入 socket 缓冲区,几乎无消耗
- 使用 DMA 将 内核缓冲区的数据写入网卡,不会使用 cpu
整个过程仅只发生了一次用户态与内核态的切换,数据拷贝了 2 次。所谓的【零拷贝】,并不是真正无拷贝,而是在不会拷贝重复数据到 jvm 内存中,零拷贝的优点有
- 更少的用户态与内核态的切换
- 不利用 cpu 计算,减少 cpu 缓存伪共享
- 零拷贝适合小文件传输
AIO
AIO 用来解决数据复制阶段的阻塞问题
- 同步意味着,在进行读写操作时,线程需要等待结果,还是相当于闲置
- 异步意味着,在进行读写操作时,线程不必等待结果,而是将来由操作系统来通过回调方式由另外的线程来获得结果
异步模型需要底层操作系统(Kernel)提供支持
- Windows 系统通过 IOCP 实现了真正的异步 IO
- Linux 系统异步 IO 在 2.6 版本引入,但其底层实现还是用多路复用模拟了异步 IO,性能没有优势
文件AIO
@Slf4j
public class AioDemo1 {
    public static void main(String[] args) throws IOException {
        try{
            AsynchronousFileChannel s =
                AsynchronousFileChannel.open(
                	Paths.get("1.txt"), StandardOpenOption.READ);
            ByteBuffer buffer = ByteBuffer.allocate(2);
            log.debug("begin...");
            s.read(buffer, 0, null, new CompletionHandler<Integer, ByteBuffer>() {
                @Override
                public void completed(Integer result, ByteBuffer attachment) {
                    log.debug("read completed...{}", result);
                    buffer.flip();
                    debug(buffer);
                }

                @Override
                public void failed(Throwable exc, ByteBuffer attachment) {
                    log.debug("read failed...");
                }
            });

        } catch (IOException e) {
            e.printStackTrace();
        }
        log.debug("do other things...");
        System.in.read();
    }
}
输出
13:44:56 [DEBUG] [main] c.i.aio.AioDemo1 - begin...
13:44:56 [DEBUG] [main] c.i.aio.AioDemo1 - do other things...
13:44:56 [DEBUG] [Thread-5] c.i.aio.AioDemo1 - read completed...2
a.
可以看到
- 响应文件读取成功的是另一个线程 Thread-5
- 主线程并没有 IO 操作阻塞
守护线程
默认文件 AIO 使用的线程都是守护线程,所以最后要执行 System.in.read() 以避免守护线程意外结束
第二章 Netty入门
2.1 Hello World
Netty是一个异步的、基于事件驱动的网络应用框架,用于快速开发可维护、高性能的网络服务器和客户端
import io.netty.bootstrap.ServerBootstrap;
import io.netty.channel.ChannelHandlerContext;
import io.netty.channel.ChannelInboundHandlerAdapter;
import io.netty.channel.ChannelInitializer;
import io.netty.channel.nio.NioEventLoopGroup;
import io.netty.channel.socket.nio.NioServerSocketChannel;
import io.netty.channel.socket.nio.NioSocketChannel;
import io.netty.handler.codec.string.StringDecoder;
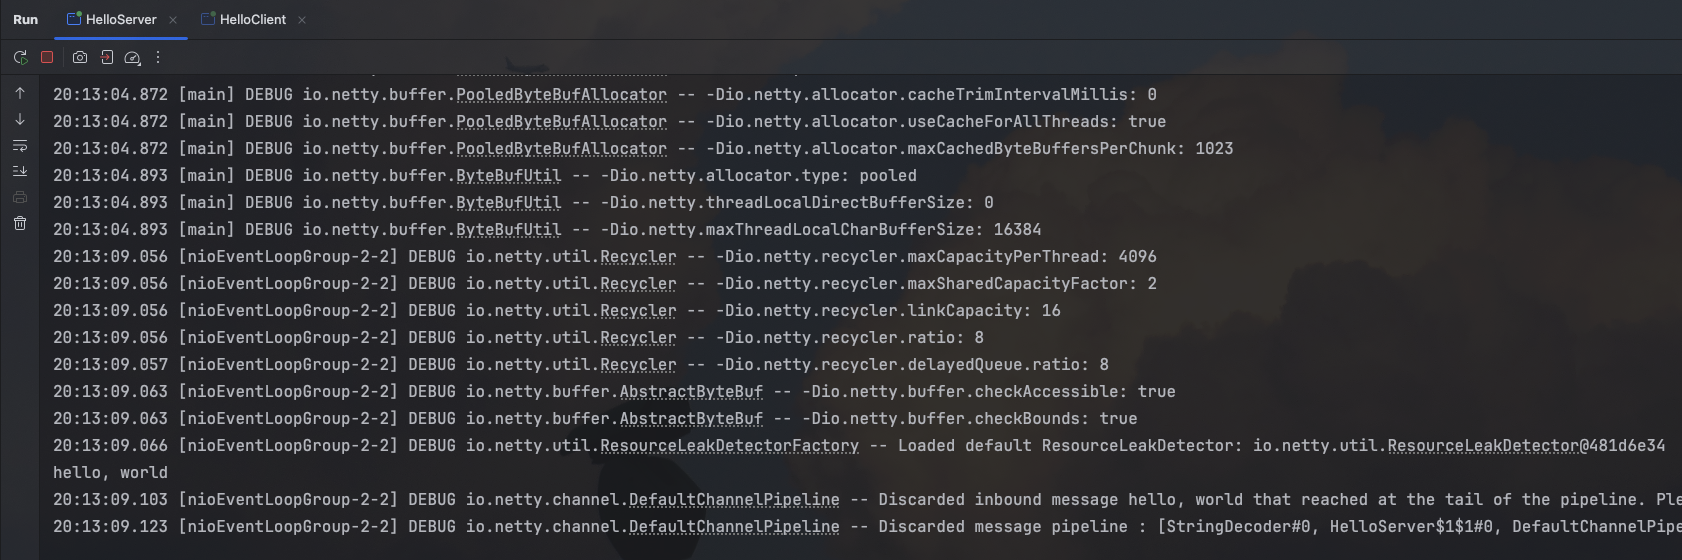
public class HelloServer {
public static void main(String[] args) {
// 1.启动器,负责组装 netty 组件,启动服务器
new ServerBootstrap()
// 2.BossEventLoop, WorkerEventLoop(selector, thread) 加入group组
.group(new NioEventLoopGroup())
// 3.选择服务器的 NioServerSocketChannel 实现
.channel(NioServerSocketChannel.class)
// 4. boss负责处理连接 worker(child) 负责处理读写,决定了worker(child)能执行哪些操作(handler)
.childHandler(
// 5.channel 代表和客户端进行数据读写的通道 Initializer 初始化,负责添加别的 handler
new ChannelInitializer<NioSocketChannel>() {
@Override
protected void initChannel(NioSocketChannel channel) throws Exception {
// 6.添加具体 handler
channel.pipeline().addLast(new StringDecoder()); // 将ByteBuf 转换为字符串
channel.pipeline().addLast(new ChannelInboundHandlerAdapter() { // 自定义 handler
@Override// 读事件
public void channelRead(ChannelHandlerContext ctx, Object msg) throws Exception {
// 打印上一步转换好的字符串
System.out.println(msg);
super.channelRead(ctx, msg);
}
});
}
})
// 7.绑定监听端口
.bind(2345);
}
}import io.netty.bootstrap.Bootstrap;
import io.netty.channel.ChannelInitializer;
import io.netty.channel.nio.NioEventLoopGroup;
import io.netty.channel.socket.nio.NioSocketChannel;
import io.netty.handler.codec.string.StringEncoder;
import java.net.InetSocketAddress;
public class HelloClient {
public static void main(String[] args) throws InterruptedException {
// 1.启动类
new Bootstrap()
// 2.添加 EventLoop
.group(new NioEventLoopGroup())
// 3.选择客户端 channel 实现
.channel(NioSocketChannel.class)
// 4.添加处理器
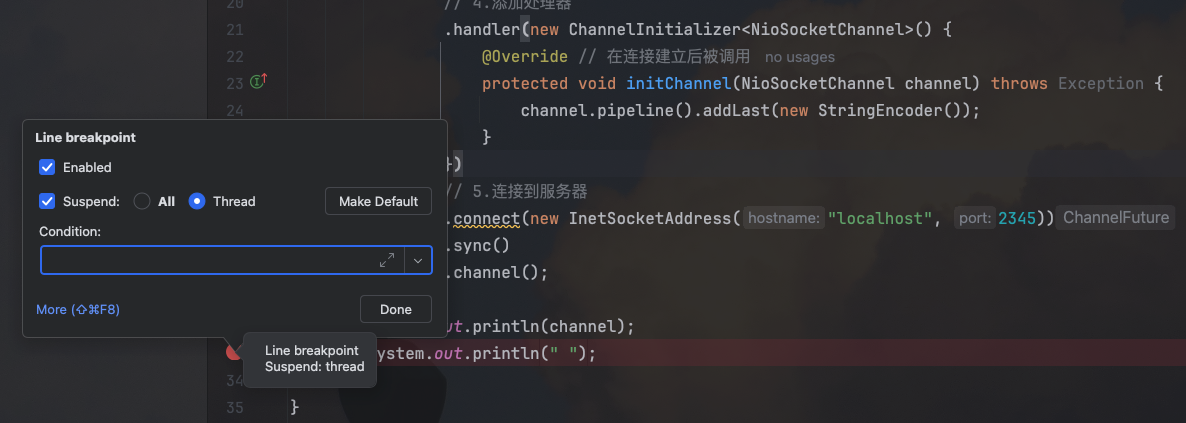
.handler(new ChannelInitializer<NioSocketChannel>() {
@Override // 在连接建立后被调用
protected void initChannel(NioSocketChannel channel) throws Exception {
channel.pipeline().addLast(new StringEncoder());
}
})
// 5.连接到服务器
.connect(new InetSocketAddress("localhost", 2345))
.sync()
.channel()
// 6.向服务器发送数据
.writeAndFlush("hello, world");
}
}坑:换端口,有时8080服务端没反应
2.2 组件
一、EventLoop
事件循环对象
EventLoop本质是一个单线程执行器(同时维护了一个Selector),里面有run方法处理Channel上源源不断的io事件
它的继承关系比较复杂
- 一条线继承自java.util.concurrent.ScheduledExecutorService 因此包含了线程池中所有的方法
- 另一条线是继承自netty自己的OrderedEventExecutor
- 提供了boolean inEventLoop(Thread thread)方法判断一个线程是否属于此EventLoop
- 提供了parent方法来看看自己属于哪个EventLoopGroup
事件循环组
EventLoopGroup是一组EventLoop,Channel一般会调用EventLoopGroup的register方法来绑定其中一个EventLoop,后续这个Channel上的io事件都由此EventLoop来处理(保证了io事件处理时的线程安全)
继承自netty自己的EventExecutorGroup
- 实现了Iterable接口提供遍历EventLoop的能力
- 另有next方法获取集合中下一个EventLoop
普通任务和定时任务
import io.netty.channel.DefaultEventLoopGroup;
import io.netty.channel.EventLoopGroup;
import io.netty.channel.nio.NioEventLoopGroup;
import lombok.extern.slf4j.Slf4j;

import java.util.concurrent.TimeUnit;

@Slf4j
public class TestEventLoop {
    public static void main(String[] args) {
        // 处理 io事件、普通任务、定时任务
        // 没有传入线程数 取电脑核心数 * 2 和 1 取最大值
        // DEFAULT_EVENT_LOOP_THREADS = Math.max(1, SystemPropertyUtil.getInt("io.netty.eventLoopThreads", NettyRuntime.availableProcessors() * 2));
        // 1.创建事件循环组
        EventLoopGroup group1 = new NioEventLoopGroup();
        // 普通任务、定时任务
        // EventLoopGroup group2 = new DefaultEventLoopGroup();

        EventLoopGroup group3 = new NioEventLoopGroup(2);

        // 2.获取下一个事件循环对象
        // 第一个事件
        System.out.println(group3.next());
        // 第二个事件
        System.out.println(group3.next());
        // 循环回第一个事件
        System.out.println(group3.next());

        // 3.执行普通任务
        group3.next().execute(() -> {
            try {
                Thread.sleep(1000);
            }catch (InterruptedException e){
                e.printStackTrace();
            }
            log.debug("ok");
        });

        // 4.执行定时任务
        group3.next().scheduleAtFixedRate(() -> {
            log.debug("ok");
        }, 0, 1, TimeUnit.SECONDS);

        log.debug("main");
    }
}- io任务
import io.netty.bootstrap.ServerBootstrap;
import io.netty.buffer.ByteBuf;
import io.netty.channel.ChannelHandlerContext;
import io.netty.channel.ChannelInboundHandlerAdapter;
import io.netty.channel.ChannelInitializer;
import io.netty.channel.nio.NioEventLoopGroup;
import io.netty.channel.socket.nio.NioServerSocketChannel;
import io.netty.channel.socket.nio.NioSocketChannel;
import lombok.extern.slf4j.Slf4j;

import java.nio.charset.Charset;

@Slf4j
public class EventLoopServer {
    public static void main(String[] args) {
        new ServerBootstrap()
                .group(new NioEventLoopGroup())
                .channel(NioServerSocketChannel.class)
                .childHandler(new ChannelInitializer<NioSocketChannel>() {
                    @Override
                    protected void initChannel(NioSocketChannel channel) throws Exception {
                        channel.pipeline().addLast(new ChannelInboundHandlerAdapter(){
                            @Override
                            public void channelRead(ChannelHandlerContext ctx, Object msg) throws Exception {
                                ByteBuf buf = (ByteBuf) msg;
                                log.debug(buf.toString(Charset.defaultCharset()));
                            }
                        });
                    }
                }).bind(2345);
    }
}
import io.netty.bootstrap.Bootstrap;
import io.netty.channel.Channel;
import io.netty.channel.ChannelInitializer;
import io.netty.channel.nio.NioEventLoopGroup;
import io.netty.channel.socket.nio.NioSocketChannel;
import io.netty.handler.codec.string.StringEncoder;
import java.net.InetSocketAddress;
public class EventLoopClient {
public static void main(String[] args) throws InterruptedException {
// 1.启动类
Channel channel = new Bootstrap()
// 2.添加 EventLoop
.group(new NioEventLoopGroup())
// 3.选择客户端 channel 实现
.channel(NioSocketChannel.class)
// 4.添加处理器
.handler(new ChannelInitializer<NioSocketChannel>() {
@Override // 在连接建立后被调用
protected void initChannel(NioSocketChannel channel) throws Exception {
channel.pipeline().addLast(new StringEncoder());
}
})
// 5.连接到服务器
.connect(new InetSocketAddress("localhost", 2345))
.sync()
.channel();
System.out.println(channel);
System.out.println("");// 断点 用debug(Thread 非阻塞)模式启动客户端
}
}
分工细化
import io.netty.bootstrap.ServerBootstrap;
import io.netty.buffer.ByteBuf;
import io.netty.channel.*;
import io.netty.channel.nio.NioEventLoopGroup;
import io.netty.channel.socket.nio.NioServerSocketChannel;
import io.netty.channel.socket.nio.NioSocketChannel;
import lombok.extern.slf4j.Slf4j;

import java.nio.charset.Charset;

@Slf4j
public class EventLoopServer {
    public static void main(String[] args) {
        // 细分2: 创建一个独立的 EventLoopGroup
        EventLoopGroup group = new DefaultEventLoopGroup();
        new ServerBootstrap()
                // boss 和 worker
                // 细分1: boss 只负责 ServerSocketChannel 上 accept 事件    worker 只负责 socketChannel 上的读写
                .group(new NioEventLoopGroup(), new NioEventLoopGroup(2))
                .channel(NioServerSocketChannel.class)
                .childHandler(new ChannelInitializer<NioSocketChannel>() {
                    @Override
                    protected void initChannel(NioSocketChannel channel) throws Exception {
                        channel.pipeline().addLast(group, "handler1", new ChannelInboundHandlerAdapter(){
                            @Override
                            public void channelRead(ChannelHandlerContext ctx, Object msg) throws Exception {
                                ByteBuf buf = (ByteBuf) msg;
                                log.debug(buf.toString(Charset.defaultCharset()));
                                // 让消息传递给handler
                                ctx.fireChannelRead(msg);
                            }
                        }).addLast(group, "handler2", new ChannelInboundHandlerAdapter(){
                            @Override
                            public void channelRead(ChannelHandlerContext ctx, Object msg) throws Exception {
                                ByteBuf buf = (ByteBuf) msg;
                                log.debug(buf.toString(Charset.defaultCharset()));
                            }
                        });
                    }
                }).bind(2345);
    }
}
handler执行中如何换人?
io.netty.channel.AbstractChannelHandlerContext 源码
static void invokeChannelRead(final AbstractChannelHandlerContext next, Object msg) {
    final Object m = next.pipeline.touch(ObjectUtil.checkNotNull(msg, "msg"), next);
    // 下一个handler的事件循环是否与当前的事件循环是同一个线程
    // 返回下一个handler 的 eventLoop
    EventExecutor executor = next.executor();

    // 当前 handler 中的线程,是否和eventLoop是同一个线程
  	// 是 直接调用
    if (executor.inEventLoop()) {
        next.invokeChannelRead(m);
    }
    // 不是 将要执行的代码作为任务提交给下一个事件循环处理(换人)
    else {
        executor.execute(new Runnable() {
            public void run() {
                next.invokeChannelRead(m);
            }
        });
    }
}
如果两个handler绑定的是同一个线程,那么就直接调用,否则,把要调用的代码封装为一个任务对象,由下一个handler的线程来调用
二、Channel
channel的主要作用
- close()可以用来关闭channel
- closeFuture()用来处理channel的关闭
- sync方法作用是同步等待channel关闭
- 而addListener方法是异步等待channel关闭
- pipeline()方法添加处理器
- write()方法将数据写入
- writeAndFlush()方法将数据写入并刷出
channelFuture连接及处理
import io.netty.bootstrap.Bootstrap;
import io.netty.channel.Channel;
import io.netty.channel.ChannelFuture;
import io.netty.channel.ChannelFutureListener;
import io.netty.channel.ChannelInitializer;
import io.netty.channel.nio.NioEventLoopGroup;
import io.netty.channel.socket.nio.NioSocketChannel;
import io.netty.handler.codec.string.StringEncoder;
import lombok.extern.slf4j.Slf4j;
import java.net.InetSocketAddress;

@Slf4j
public class EventLoopClient {
    public static void main(String[] args) throws InterruptedException {
        // 1.启动类
        // 带有 Future, Promise 的类型都是和 异步方法 配套使用,用来处理结果
        ChannelFuture channelFuture = new Bootstrap()
                // 2.添加 EventLoop
                .group(new NioEventLoopGroup())
                // 3.选择客户端 channel 实现
                .channel(NioSocketChannel.class)
                // 4.添加处理器
                .handler(new ChannelInitializer<NioSocketChannel>() {
                    @Override // 在连接建立后被调用
                    protected void initChannel(NioSocketChannel channel) throws Exception {
                        channel.pipeline().addLast(new StringEncoder());
                    }
                })
                // 5.连接到服务器
                // 异步非阻塞,main 发起了调用,真正执行 connect 是 nio 线程
                .connect(new InetSocketAddress("localhost", 2345));

//        // 1、使用 sync 方法同步处理结果
//        // 阻塞住当前线程,直到nio线程连接建立完毕
//        channelFuture.sync();
//        // 无阻塞向下执行获取 channel
//        Channel channel = channelFuture.channel();
//        log.debug("{}", channel);
//        // 向服务器发送数据
//        channel.writeAndFlush("hello, world");

        // 2、使用addListener 方法异步处理结果
        channelFuture.addListener(new ChannelFutureListener() {
            // 在 nio 线程连接建立好之后,会调用 operationComplete
            @Override
            public void operationComplete(ChannelFuture channelFuture) throws Exception {
                Channel channel = channelFuture.channel();
                log.debug("{}", channel);
                channel.writeAndFlush("hello, world");
            }
        });
    }
}
channelFuture处理关闭
import io.netty.bootstrap.Bootstrap;
import io.netty.channel.Channel;
import io.netty.channel.ChannelFuture;
import io.netty.channel.ChannelFutureListener;
import io.netty.channel.ChannelInitializer;
import io.netty.channel.nio.NioEventLoopGroup;
import io.netty.channel.socket.nio.NioSocketChannel;
import io.netty.handler.codec.string.StringEncoder;
import lombok.extern.slf4j.Slf4j;

import java.net.InetSocketAddress;
import java.util.Scanner;

@Slf4j
public class CloseFutureClient {
    public static void main(String[] args) throws InterruptedException {
        NioEventLoopGroup group = new NioEventLoopGroup();
        ChannelFuture channelFuture = new Bootstrap()
                .group(group)
                .channel(NioSocketChannel.class)
                .handler(new ChannelInitializer<NioSocketChannel>() {
                    @Override
                    protected void initChannel(NioSocketChannel channel) throws Exception {
                        channel.pipeline().addLast(new StringEncoder());
                    }
                })
                .connect(new InetSocketAddress("localhost", 2345));

        Channel channel = channelFuture.sync().channel();
        new Thread(() -> {
            Scanner sc = new Scanner(System.in);
            while (true) {
                String line = sc.nextLine();
                if ("q".equals(line)) {
                    channel.close();// close 异步操作1s之后
                    // log.debug("处理关闭之后的操作");// 这个线程和关闭通道的线程不是一个,所以不能在这里进行关闭后的逻辑处理
                    break;
                }
                channel.writeAndFlush(line);
            }
        }, "input").start();

        // 获取ClosedFuture 对象 1) 同步处理关闭 2) 异步处理关闭
        ChannelFuture closeFuture = channel.closeFuture();
        // closeFuture.sync();
        closeFuture.addListener((ChannelFutureListener) channelFuture1 -> {
            log.debug("处理关闭之后的操作");// 在这里处理
            group.shutdownGracefully();
        });
    }
}
三、Future & Promise
在异步处理时,经常用到这两个接口
netty中的Future与jdk中的Future同名,但是是两个接口,netty的Future继承自jdk的Future,而Promise又对netty Future进行了扩展
- jdk Future只能同步等待任务结束(或成功 或失败)才能得到结果
- netty Future可以同步等待任务结束得到结果,也可以异步方式得到结果,但是都是要等任务结束
- netty Promise不仅有netty Future的功能,而且脱离了任务独立存在,只作为两个线程间传递结果的容器
import lombok.extern.slf4j.Slf4j;

import java.util.concurrent.*;

@Slf4j
public class TestJdkFuture {
    public static void main(String[] args) throws ExecutionException, InterruptedException {
        // 1、线程池
        ExecutorService service = Executors.newFixedThreadPool(2);
        // 2、提交任务
        Future<Integer> future = service.submit(new Callable<Integer>() {
            @Override
            public Integer call() throws Exception {
                log.debug("执行计算");
                Thread.sleep(1000);
                return 50;
            }
        });
        // 3.主线程通过 future 来获取结果
        log.debug("等待结果是");
        log.debug("结果是{}", future.get());
    }
}
import io.netty.channel.EventLoop;
import io.netty.channel.nio.NioEventLoopGroup;
import io.netty.util.concurrent.Future;
import io.netty.util.concurrent.GenericFutureListener;
import lombok.extern.slf4j.Slf4j;
import java.util.concurrent.Callable;
@Slf4j
public class TestNettyFuture {
public static void main(String[] args) {
NioEventLoopGroup group = new NioEventLoopGroup();
EventLoop eventLoop = group.next();
Future<Integer> future = eventLoop.submit(new Callable<Integer>() {
@Override
public Integer call() throws Exception {
log.debug("执行计算");
Thread.sleep(1000);
return 70;
}
});
future.addListener(new GenericFutureListener<Future<? super Integer>>() {
@Override
public void operationComplete(Future<? super Integer> future) throws Exception {
log.debug("接收结果:{}", future.getNow());
}
});
}
}promise
import io.netty.channel.EventLoop;
import io.netty.channel.nio.NioEventLoopGroup;
import io.netty.util.concurrent.DefaultPromise;
import lombok.extern.slf4j.Slf4j;

import java.util.concurrent.ExecutionException;

@Slf4j
public class TestNettyPromise {
    public static void main(String[] args) throws ExecutionException, InterruptedException {
        // 1.准备 EventLoop对象
        EventLoop eventLoop = new NioEventLoopGroup().next();

        // 2.可以主动创建 promise, 结果容器
        DefaultPromise<Integer> promise = new DefaultPromise<>(eventLoop);

        new Thread(() -> {
            // 3.任意一个线程执行计算, 计算完毕后向promise 填充结果
            log.debug("开始计算...");
           try {
               // int i = 1 / 0;
               Thread.sleep(1000);
               promise.setSuccess(80);
           } catch (Exception e) {
               e.printStackTrace();
               promise.setFailure(e);
           }
        }).start();

        // 4.接收结果的线程
        log.debug("等待结果...");
        log.debug("结果是: {}", promise.get());
    }
}
四、Handler & Pipeline
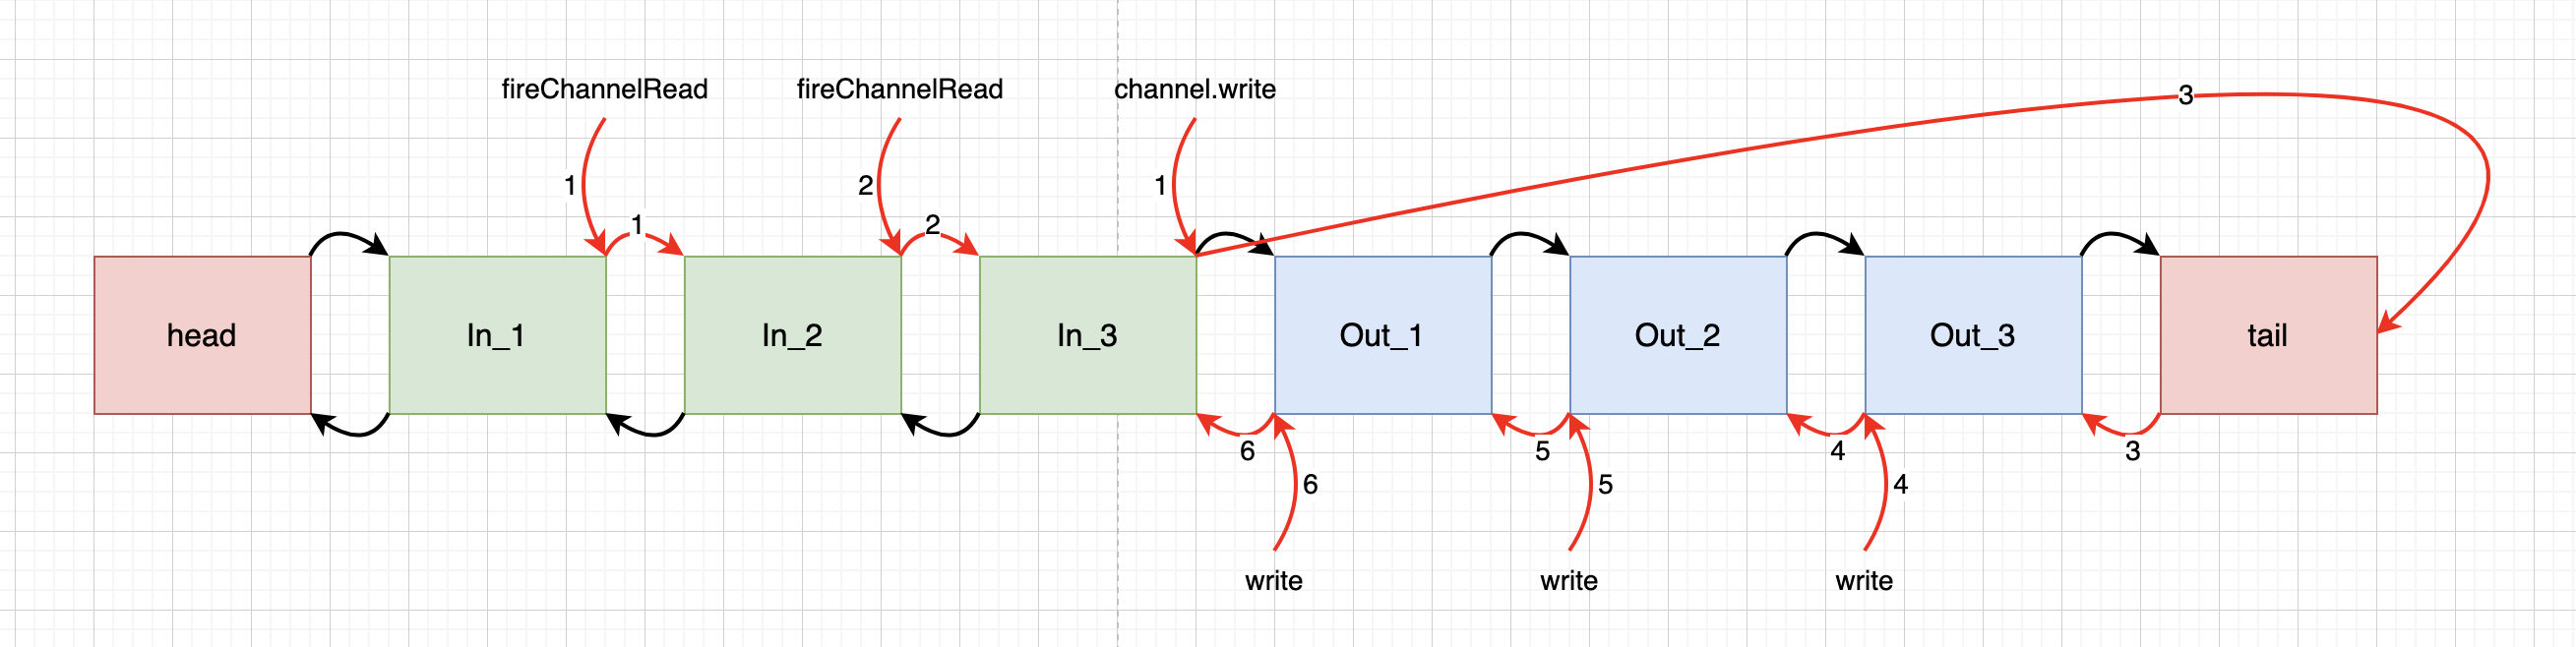
ChannelHandler用来处理Channel上的各种事件,分为入站、出站两种,所有ChannelHandler被连成一串,就是Pipeline
- 入站处理器通常是ChannelInboundHandlerAdapter的子类,主要用来读取客户端数据,写回结果
- 出战处理器通常是ChannelOutboundHandlerAdapter的子类,主要对写回结果进行加工
如果每个Channel是一个产品的加工车间,Pipeline是车间中的流水线,ChannelHandler就是流水线上的各道工序,而ByteBuf是原材料,经过很多工序的加工:先经过一道道入站工序,再经过一道道出站工序,最终变成产品
- channel.writeAndFlush 从tail 从后向前找
- ctx.writeAndFlush 从当前节点 从后向前找
import io.netty.bootstrap.ServerBootstrap;
import io.netty.buffer.ByteBuf;
import io.netty.channel.*;
import io.netty.channel.nio.NioEventLoopGroup;
import io.netty.channel.socket.nio.NioServerSocketChannel;
import io.netty.channel.socket.nio.NioSocketChannel;
import lombok.AllArgsConstructor;
import lombok.Data;
import lombok.extern.slf4j.Slf4j;

import java.nio.charset.Charset;

@Slf4j
public class TestPipeline {
    public static void main(String[] args) {
        new ServerBootstrap()
                .group(new NioEventLoopGroup())
                .channel(NioServerSocketChannel.class)
                .childHandler(new ChannelInitializer<NioSocketChannel>() {
                    @Override
                    protected void initChannel(NioSocketChannel channel) throws Exception {
                        // 1.通过 channel 拿到 pipeline
                        ChannelPipeline pipeline = channel.pipeline();
                        // 2.添加处理器 head -> h1 -> h2 -> h3 -> h4 -> h5 -> h6 -> tail 双向链表
                        // 入站 1 2 3 出站 6 5 4
                        pipeline.addLast("h1", new ChannelInboundHandlerAdapter(){
                            @Override
                            public void channelRead(ChannelHandlerContext ctx, Object msg) throws Exception {
                                log.debug("1");
                                ByteBuf buf = (ByteBuf) msg;
                                String name = buf.toString(Charset.defaultCharset());
                                super.channelRead(ctx, name);
                            }
                        });

                        pipeline.addLast("h2", new ChannelInboundHandlerAdapter(){
                            @Override
                            public void channelRead(ChannelHandlerContext ctx, Object name) throws Exception {
                                log.debug("2");
                                Student student = new Student(name.toString());
                                super.channelRead(ctx, student);
                            }
                        });

                        pipeline.addLast("h3", new ChannelInboundHandlerAdapter(){
                            @Override
                            public void channelRead(ChannelHandlerContext ctx, Object msg) throws Exception {
                                log.debug("3, 结果{}, class:{}", msg, msg.getClass());
                                // 触发出站动作
                                channel.writeAndFlush(ctx.alloc().buffer().writeBytes("server...".getBytes()));
                            }
                        });

                        pipeline.addLast("h4", new ChannelOutboundHandlerAdapter(){
                            @Override
                            public void write(ChannelHandlerContext ctx, Object msg, ChannelPromise promise) throws Exception {
                                log.debug("4");
                                super.write(ctx, msg, promise);
                            }
                        });

                        pipeline.addLast("h5", new ChannelOutboundHandlerAdapter(){
                            @Override
                            public void write(ChannelHandlerContext ctx, Object msg, ChannelPromise promise) throws Exception {
                                log.debug("5");
                                super.write(ctx, msg, promise);
                            }
                        });

                        pipeline.addLast("h6", new ChannelOutboundHandlerAdapter(){
                            @Override
                            public void write(ChannelHandlerContext ctx, Object msg, ChannelPromise promise) throws Exception {
                                log.debug("6");
                                super.write(ctx, msg, promise);
                            }
                        });
                    }
                }).bind(2345);
    }

    @Data
    @AllArgsConstructor
    static class Student {
        private String name;
    }
}
五、ByteBuf
是对字节数据的封装
1、创建
import io.netty.buffer.ByteBuf;
import io.netty.buffer.ByteBufAllocator;

public class TestByteBuf {
    public static void main(String[] args) {
        ByteBuf buf = ByteBufAllocator.DEFAULT.buffer();
        System.out.println(buf);
        StringBuilder sb = new StringBuilder();

        for (int i = 0; i < 300; i++) {
            sb.append("a");
        }
        buf.writeBytes(sb.toString().getBytes());
        System.out.println(buf);
    }
}
2、直接内存 & 堆内存
可以使用下面的代码来创建池化基于堆的ByteBuf
ByteBuf buffer = ByteBufAllocator.DEFAULT.heapBuffer(10);也可以使用下面的代码来创建池化基于直接内存的ByteBuf
ByteBuf buffer = ByteBufAllocator.DEFAULT.directBuffer(10);- 直接内存创建和销毁的代价昂贵,但读写性能高(少一次内存复制),适合配合池化功能一起使用
- 直接内存对GC压力小,因为这部分内存不受JVM垃圾回收的管理,但也要注意及时主动释放
3、池化 & 非池化
池化的最大意义在于可以重用ByteBuf,优点有
- 没有池化,则每次都得创建新的ByteBuf实例,这个操作对直接内存,代价昂贵,就算是堆内存,也会增加GC压力
- 有了池化,则可以重用池中ByteBuf实例,并且采用了与jemalloc类似的内存分配算法提升分配效率
- 高并发时,池化功能更节约内存,减少内存溢出的可能
池化功能是否开启,可以通过下面的系统环境变量来设置
-Dio.netty.allocator.type={unpooled|pooled}- 4.1以后,非Android平台默认启用池化实现,Android平台启用非池化实现
- 4.1之前,池化功能还不成熟,默认是非池化实现
4、组成
ByteBuf由四部分组成
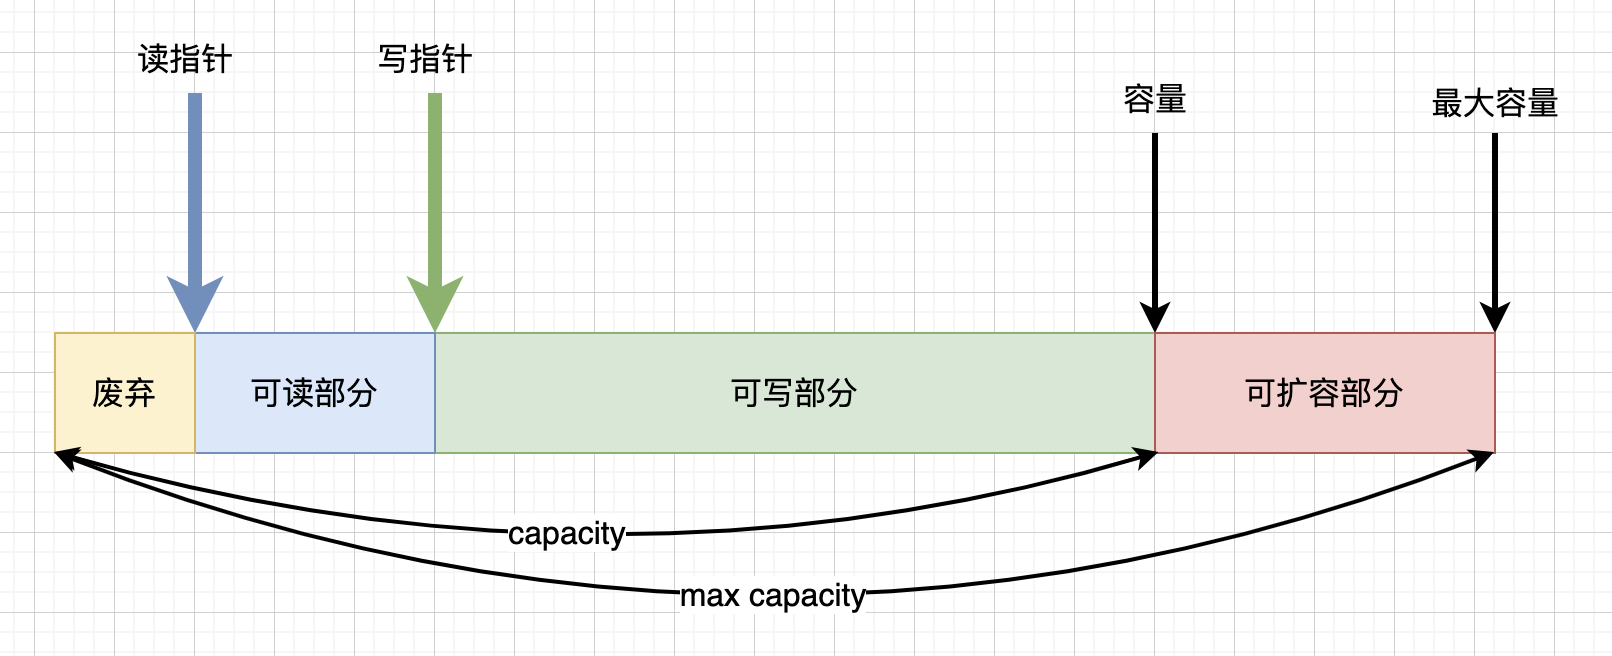
最开始读写指针都在0位置
5、写入
| 方法签名 | 含义 | 备注 |
|---|---|---|
| writeBoolean(boolean value) | 写入 boolean 值 | 用一字节 01|00 代表 true|false |
| writeByte(int value) | 写入 byte 值 | |
| writeShort(int value) | 写入 short 值 | |
| writeInt(int value) | 写入 int 值 | Big Endian,即 0x250,写入后 00 00 02 50 |
| writeIntLE(int value) | 写入 int 值 | Little Endian,即 0x250,写入后 50 02 00 00 |
| writeLong(long value) | 写入 long 值 | |
| writeChar(int value) | 写入 char 值 | |
| writeFloat(float value) | 写入 float 值 | |
| writeDouble(double value) | 写入 double 值 | |
| writeBytes(ByteBuf src) | 写入 netty 的 ByteBuf | |
| writeBytes(byte[] src) | 写入 byte[] | |
| writeBytes(ByteBuffer src) | 写入 nio 的 ByteBuffer | |
| int writeCharSequence(CharSequence sequence, Charset charset) | 写入字符串 |
注意
- 这些方法的未指明返回值的,其返回值都是 ByteBuf,意味着可以链式调用
- 网络传输,默认习惯是 Big Endian
6、扩容
在写入一个int整数时,容量不够了(初始容量是10),这时会引发扩容
buffer.writeInt(6);扩容规则:
- 如果写入后数据大小没有超过512,则选择下一个16的整数倍,例如写入后大小为12,则扩容后capacity是16
- 如果写入后数据大小超过512,则选择下一个2^n,例如写入后大小为513,则扩容后capacity是2^10=1024
- 扩容不能超过max capacity(默认是int最大值),会报错
7、读取
例如读了 4 次,每次一个字节
System.out.println(buffer.readByte());// 1
System.out.println(buffer.readByte());// 2
System.out.println(buffer.readByte());// 3
System.out.println(buffer.readByte());// 4
读过的内容属于废弃部分,再读只能读那些尚未读取的部分
如果需要重复读取 int 整数 5,怎么办?
可以在 read 前先做个标记 mark
buffer.markReaderIndex();
System.out.println(buffer.readInt());// 5
这时要重复读取的话,重置到标记位置 reset
buffer.resetReaderIndex();还有种办法是采用 get 开头的一系列方法,这些方法不会改变 read index
8、retain & release
由于Netty中有堆外内存的ByteBuf实现,堆外内存最好是手动来释放,而不是等GC垃圾回收
- UnpooledHeapByteBuf使用的是JVM内存,只需等GC回收内存即可
- UnpooledDirectByteBuf使用的就是直接内存了,需要特殊的方法来回收内存
- PooledByteBuf和它的子类使用了池化机制,需要更复杂的规则来回收内存
回收内存的源码实现,请关注下面方法的不同实现
protected abstract void deallocate()
Netty这里采用了引用计数法来控制回收内存,每个ByteBuf都实现了ReferenceCounted接口
- 每个ByteBuf对象的初始计数为1
- 调用release方法计数减1,如果计数为0,ByteBuf内存被回收
- 调用retain方法计数加1,表示调用者没用完之前,其他handler即使调用了release也不会造成回收
- 当计数为0时,底层内存会被回收,这时即使ByteBuf对象还在,其各个方法均无法正常使用
因为 pipeline 的存在,一般需要将 ByteBuf 传递给下一个 ChannelHandler,如果在 finally 中 release 了,就失去了传递性(当然,如果在这个 ChannelHandler 内这个 ByteBuf 已完成了它的使命,那么便无须再传递)
基本规则是,谁是最后使用者,谁负责 release,详细分析如下
- 起点,对于 NIO 实现来讲,在 io.netty.channel.nio.AbstractNioByteChannel.NioByteUnsafe#read 方法中首次创建 ByteBuf 放入 pipeline(line 163 pipeline.fireChannelRead(byteBuf))
- 入站 ByteBuf 处理原则
- 对原始 ByteBuf 不做处理,调用 ctx.fireChannelRead(msg) 向后传递,这时无须 release
- 将原始 ByteBuf 转换为其它类型的 Java 对象,这时 ByteBuf 就没用了,必须 release
- 如果不调用 ctx.fireChannelRead(msg) 向后传递,那么也必须 release
- 注意各种异常,如果 ByteBuf 没有成功传递到下一个 ChannelHandler,必须 release
- 假设消息一直向后传,那么 TailContext 会负责释放未处理消息(原始的 ByteBuf)
- 出站 ByteBuf 处理原则
- 出站消息最终都会转为 ByteBuf 输出,一直向前传,由 HeadContext flush 后 release
- 异常处理原则
- 有时候不清楚 ByteBuf 被引用了多少次,但又必须彻底释放,可以循环调用 release 直到返回 true
TailContext 释放未处理消息逻辑
// io.netty.channel.DefaultChannelPipeline#onUnhandledInboundMessage(java.lang.Object)
protected void onUnhandledInboundMessage(Object msg) {
    try {
        logger.debug(
            "Discarded inbound message {} that reached at the tail of the pipeline. " +
            "Please check your pipeline configuration.", msg);
    } finally {
        ReferenceCountUtil.release(msg);
    }
}
具体代码
// io.netty.util.ReferenceCountUtil#release(java.lang.Object)
public static boolean release(Object msg) {
    if (msg instanceof ReferenceCounted) {
        return ((ReferenceCounted) msg).release();
    }
    return false;
}
9、slice
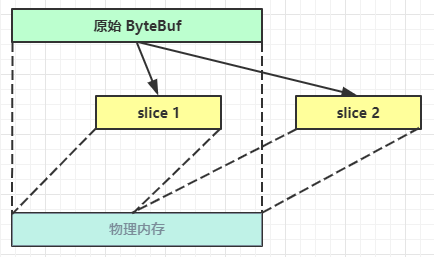
零拷贝的体现之一,对原始ByteBuf进行切片成多个ByteBuf,切片后的ByteBuf并没有发生内存复制,还是使用原始ByteBuf的内存,切片后的ByteBuf维护独立的read,write指针
10、duplicate
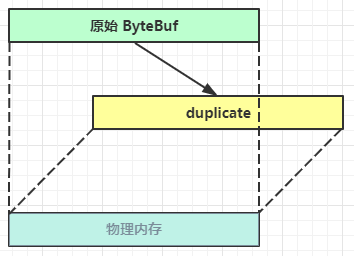
零拷贝的体现之一,就好比截取了原始 ByteBuf 所有内容,并且没有 max capacity 的限制,也是与原始 ByteBuf 使用同一块底层内存,只是读写指针是独立的
11、copy
会将底层内存数据进行深拷贝,因此无论读写,都与原始ByteBuf无关
12、CompositeByteBuf
零拷贝的体现之一,可以将多个 ByteBuf 合并为一个逻辑上的 ByteBuf,避免拷贝
13、Unpooled
Unpooled 是一个工具类,类如其名,提供了非池化的 ByteBuf 创建、组合、复制等操作
零拷贝相关的 wrappedBuffer 方法,可以用来包装 ByteBuf
ByteBuf buf1 = ByteBufAllocator.DEFAULT.buffer(5);
buf1.writeBytes(new byte[]{1, 2, 3, 4, 5});
ByteBuf buf2 = ByteBufAllocator.DEFAULT.buffer(5);
buf2.writeBytes(new byte[]{6, 7, 8, 9, 10});

// 当包装 ByteBuf 个数超过一个时, 底层使用了 CompositeByteBuf
ByteBuf buf3 = Unpooled.wrappedBuffer(buf1, buf2);
System.out.println(ByteBufUtil.prettyHexDump(buf3));
第三章 Netty进阶
3.1 黏包和半包
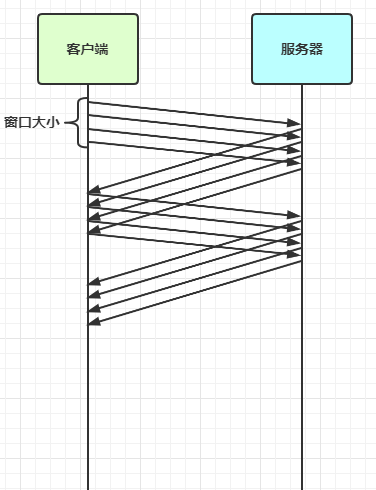
一、滑动窗口
- TCP以一个段(segment)为单位,每发送一个段就需要进行一次确认应答(ack)处理,但如果这么做,缺点是包的往返时间越长性能就越差
- 为了解决此问题,引入了窗口概念,窗口大小即决定了无需等待应答而可以继续发送的数据最大值
- 窗口实际就起到一个缓冲区的作用,同时也能起到流量控制的作用
- 图中深色的部分即要发送的数据,高亮的部分即窗口
- 窗口内的数据才允许被发送,当应答未到达前,窗口必须停止滑动
- 如果1001~2000这个段段数据ack回来了,窗口就可以向前滑动
- 接收方也会维护一个窗口,只有落在窗内的数据才能允许接收
二、分析
黏包
- 现象,发送abc def,接收abcdef
- 原因
- 应用层:接收方ByteBuf设置太大(Netty默认 1024)
- 滑动窗口:假设发送方256bytes表示一个完整报文,但由于接收方处理不及时且窗口大小足够大,这256bytes字节就会缓冲在接收方的滑动窗口中,当滑动窗口中缓冲了多个报文就会黏包
- Nagle算法:会造成黏包
半包
- 现象,发送abcdef,接收abc def
- 原因
- 应用层:接收方ByteBuf小于实际发送数据量
- 滑动窗口:假设接收方的窗口只剩了128bytes,发送方的报文大小是256bytes,这时放不下了,只能先发送128bytes,等待ack后才能发送剩余部分,这就造成了半包
- MSS限制:当发送的数据超过MSS限制后,会将数据切分发送,就会造成半包
本质是因为TCP是流式协议,消息无边界
三、解决
1、短连接(能解决黏包,不能避免半包)
每次发送完,将channel关闭
ctx.channel.close();