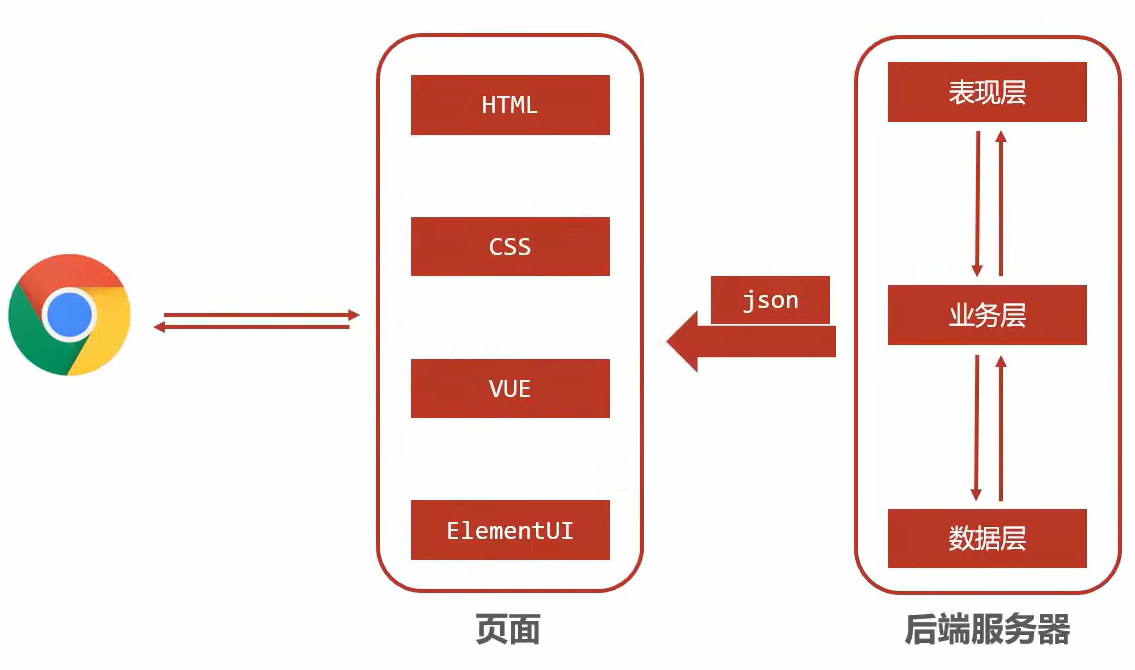
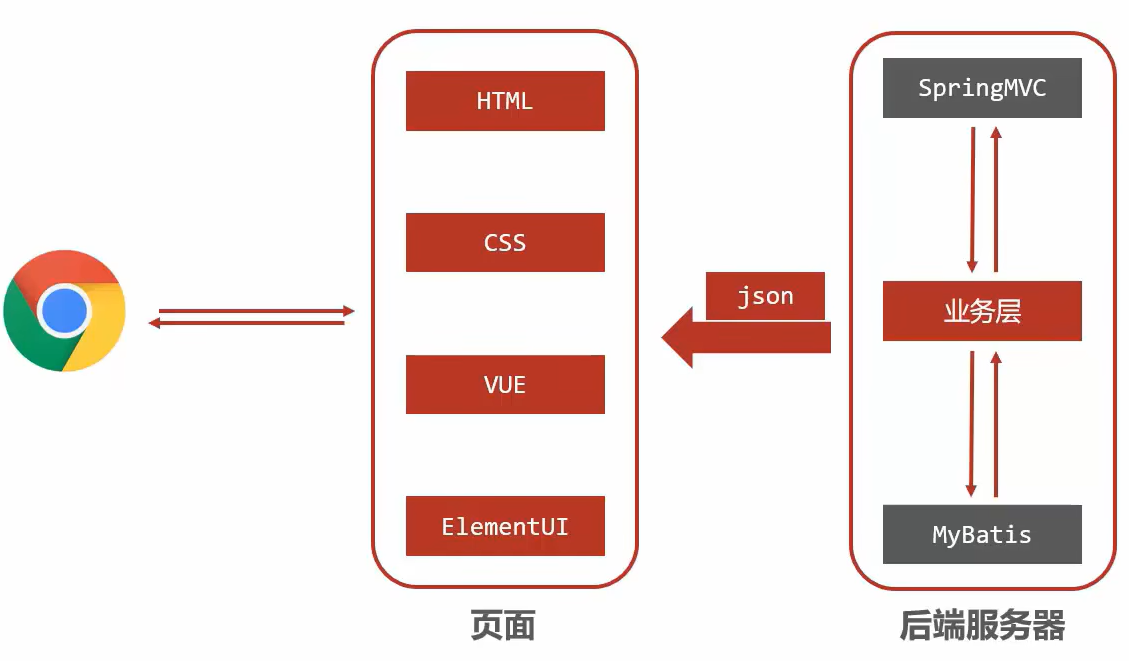
SpringMVC
第一章 SpingMVC简介
1.1SpringMVC概述
- SpringMVC是一种基于Java实现MVC模型的轻量级Web框架
- SpringMVC技术与Servlet技术功能等同,均属于web开发技术
优点:
- 使用简单,开发便捷(相比于Servlet)
- 灵活性强
传统Servlet
package com.priv.servlet;

import javax.servlet.ServletException;
import javax.servlet.annotation.WebServlet;
import javax.servlet.http.HttpServlet;
import javax.servlet.http.HttpServletRequest;
import javax.servlet.http.HttpServletResponse;
import java.io.IOException;
import java.io.PrintWriter;

/**
 * @author : 十一
 * @data : 13:45 2022/12/17
 * When in doubt, use brute force.
 */
@WebServlet("/user/delete")
public class UserDeleteServlet extends HttpServlet {
    @Override
    protected void doGet(HttpServletRequest req, HttpServletResponse resp) throws ServletException, IOException {
        //1.接受请求参数
        String name = req.getParameter("name");
        System.out.println("servlet delete name ==>" + name);
        //2.产生响应
        resp.setContentType("text/json;charset=utf-8");
        PrintWriter pw = resp.getWriter();
        pw.write("{'module' : 'servlet delete'}");
    }

    @Override
    protected void doPost(HttpServletRequest req, HttpServletResponse resp) throws ServletException, IOException {
        this.doGet(req, resp);
    }
}
SpringMVC
package com.priv.springmvc;

import org.springframework.stereotype.Controller;
import org.springframework.web.bind.annotation.RequestMapping;
import org.springframework.web.bind.annotation.ResponseBody;

/**
 * @author : 十一
 * @data : 14:05 2022/12/17
 * When in doubt, use brute force.
 */
@Controller
public class UserController {

    @RequestMapping("/save")
    @ResponseBody
    public String save(String name){
        System.out.println("springmvc save name ==> " + name);
        return "{'module' : 'springmvc save'}";
    }

    @RequestMapping("/delete")
    @ResponseBody
    public String delete(String name){
        System.out.println("springmvc delete name ==> " + name);
        return "{'module' : 'springmvc delete'}";
    }

    @RequestMapping("/select")
    @ResponseBody
    public String select(String name){
        System.out.println("springmvc select name ==> " + name);
        return "{'module' : 'springmvc select'}";
    }

    @RequestMapping("/update")
    @ResponseBody
    public String update(String name){
        System.out.println("springmvc update name ==> " + name);
        return "{'module' : 'springmvc update'}";
    }
}
1.2入门案例
一、先导入SpringMVC和Servlet的坐标
<dependency>
    <groupId>javax.servlet</groupId>
    <artifactId>javax.servlet-api</artifactId>
    <version>4.0.1</version>
</dependency>
<dependency>
    <groupId>org.springframework</groupId>
    <artifactId>spring-webmvc</artifactId>
    <version>6.0.3</version>
</dependency>
二、创建SpringMVC控制器类(等同于Servlet功能)
package com.priv.controller;

import org.springframework.stereotype.Controller;
import org.springframework.web.bind.annotation.RequestMapping;
import org.springframework.web.bind.annotation.ResponseBody;

/**
 * @author : 十一
 * @data : 14:51 2022/12/25
 * When in doubt, use brute force.
 */
@Controller
public class UserController {

    @RequestMapping("/save")
    @ResponseBody
    public String save(){
        System.out.println("user save ...");
        return "{'module' : 'springmvc'}";
    }
}
三、初始化SpringMVC环境(同Spring环境),设定SpringMVC加载对应的bean
package com.priv.config;

import org.springframework.context.annotation.ComponentScan;
import org.springframework.context.annotation.Configuration;

/**
 * @author : 十一
 * @data : 14:54 2022/12/25
 * When in doubt, use brute force.
 */
@Configuration
@ComponentScan("com.priv.controller")
public class SpringMvcConfig {
}
四、初始化Servlet容器,加载SpringMVC环境,并设置SpringMVC技术处理的请求
package com.priv.config;

import org.springframework.context.annotation.AnnotationConfigApplicationContext;
import org.springframework.web.context.WebApplicationContext;
import org.springframework.web.context.support.AnnotationConfigWebApplicationContext;
import org.springframework.web.servlet.support.AbstractDispatcherServletInitializer;

/**
 * @author : 十一
 * @data : 14:56 2022/12/25
 * When in doubt, use brute force.
 */
public class ServletContainersInitConfig extends AbstractDispatcherServletInitializer {
    /**
     * 加载SpringMVC容器配置
     */
    @Override
    protected WebApplicationContext createServletApplicationContext() {
        AnnotationConfigWebApplicationContext ctx = new AnnotationConfigWebApplicationContext();
        ctx.register(SpringMvcConfig.class);
        return ctx;
    }

    /**
     * 设置哪些请求归属SpringMVC处理
     */
    @Override
    protected String[] getServletMappings() {
        return new String[]{"/"};
    }

    /**
     * 加载Spring容器配置
     */
    @Override
    protected WebApplicationContext createRootApplicationContext() {
        return null;
    }
}
1.3入门案例工作流程分析
启动服务器初始化过程
1、服务器启动,执行ServletContainerInitConfig类,初始化web容器
2、执行createServletApplicationContext方法,创建了WebApplicationContext对象
3、加载SpringMvcConfig
4、执行@ComponentScan加载对应的bean
5、加载UserController,每个@RequestMapping的名称对应一个具体的方法
6、执行getServletMappings方法,定义所有的请求都通过SpringMVC
单次请求过程
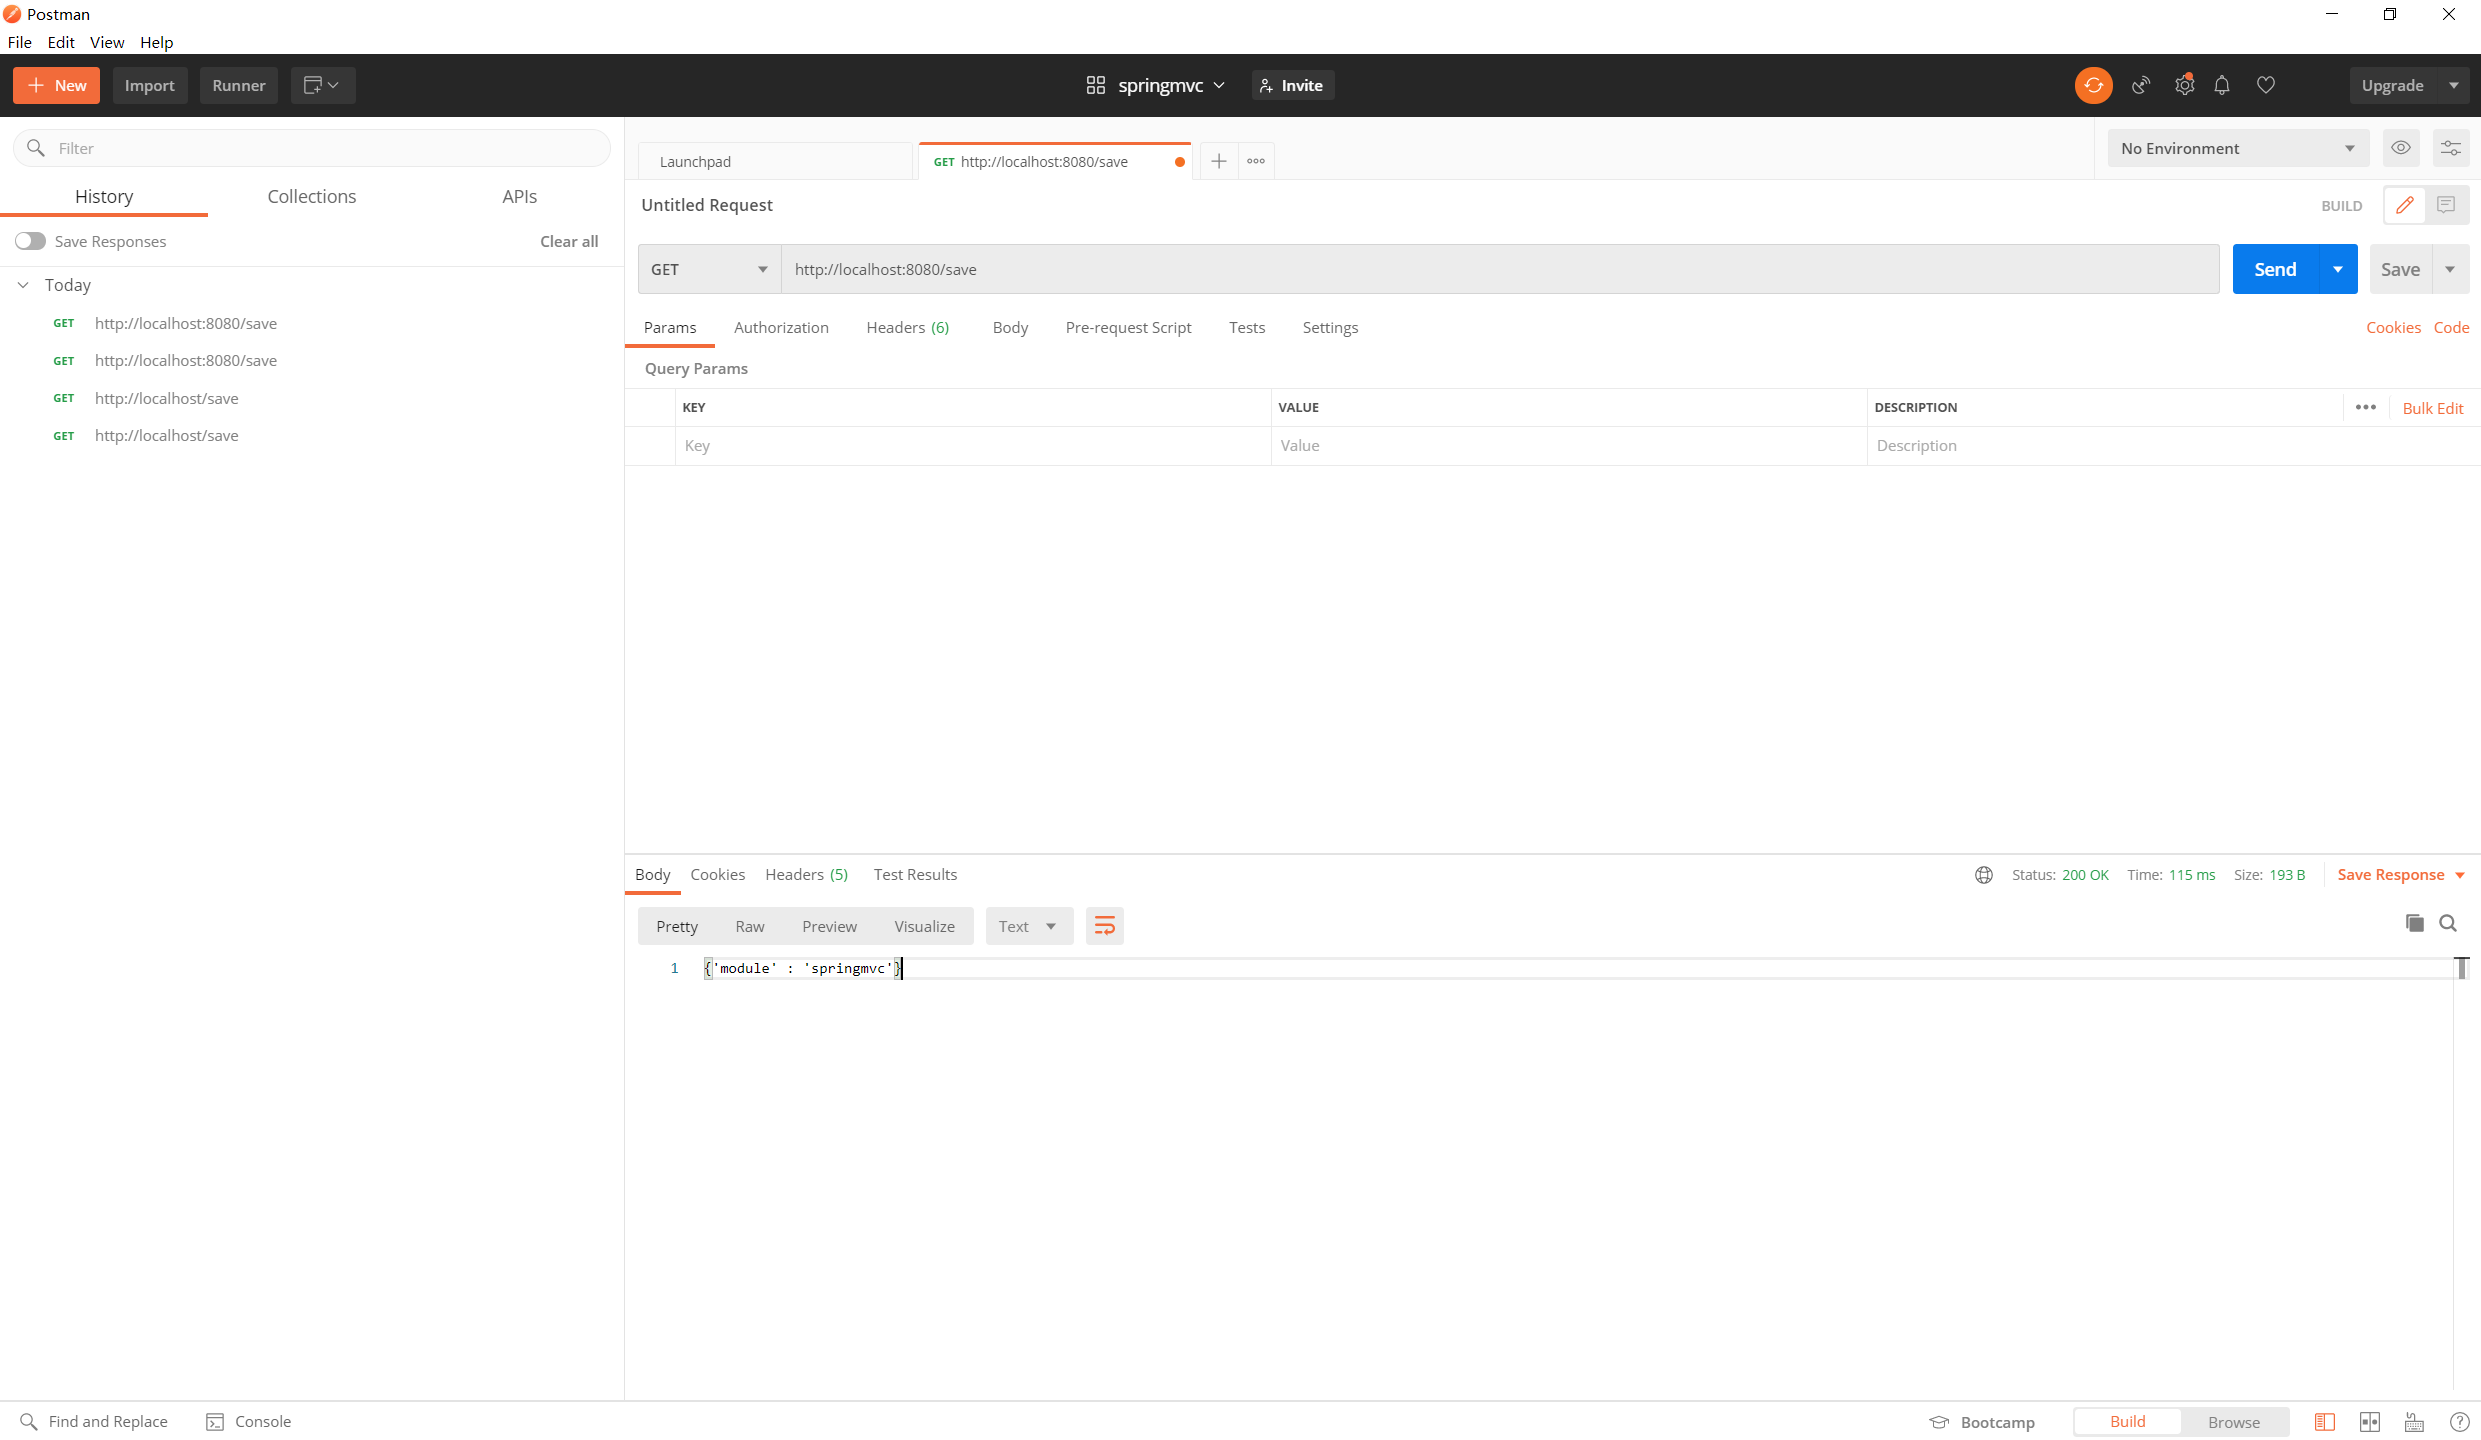
1、发送请求localhost/save
2、web容器发现所有请求都经过SpringMVC,将请求交给SpringMVC处理
3、解析请求路径/save
4、由/save匹配执行对应的方法save()
5、执行save()
6、检测到有@ResponseBody直接将save()方法的返回值作为响应体返回给请求方

1.4Controller加载控制
一、因为功能不同,如何避免Spring错误的加载到SpringMVC的bean?
加载Spring控制的bean的时候排除掉SpringMVC控制的bean
- SpringMVC相关bean加载控制
- SpringMVC加载的bean对应的包均在com.priv.controller包内
- Spring相关bean加载控制
- 方式一:Spring加载的bean设定扫描范围为com.priv,排除掉controller包内的bean
- 方式二:Spring加载的bean设定扫描范围为精准范围,如service包,dao包等
- 方式三:不区分Spring与SpringMVC的环境,加载到同一个环境中
package com.priv.config;

import org.springframework.context.annotation.ComponentScan;
import org.springframework.context.annotation.Configuration;
import org.springframework.context.annotation.FilterType;
import org.springframework.stereotype.Controller;

/**
 * @author : 十一
 * @data : 14:54 2022/12/25
 * When in doubt, use brute force.
 */
@Configuration
@ComponentScan(value = "com.priv",
        excludeFilters = @ComponentScan.Filter(
            type = FilterType.ANNOTATION,//按注解排除,使用Controller注解排除
            classes = Controller.class
))
public class SpringConfig {
}
package com.priv.config;
import org.springframework.web.context.WebApplicationContext;
import org.springframework.web.context.support.AnnotationConfigWebApplicationContext;
import org.springframework.web.servlet.support.AbstractDispatcherServletInitializer;
/**
* @author : 十一
* @data : 14:56 2022/12/25
* When in doubt, use brute force.
*/
public class ServletContainersInitConfig extends AbstractDispatcherServletInitializer {
/**
* 加载SpringMVC容器配置
*/
@Override
protected WebApplicationContext createServletApplicationContext() {
AnnotationConfigWebApplicationContext ctx = new AnnotationConfigWebApplicationContext();
ctx.register(SpringMvcConfig.class);
return ctx;
}
/**
* 设置哪些请求归属SpringMVC处理
*/
@Override
protected String[] getServletMappings() {
return new String[]{"/"};
}
/**
* 加载Spring容器配置
*/
@Override
protected WebApplicationContext createRootApplicationContext() {
AnnotationConfigWebApplicationContext ctx = new AnnotationConfigWebApplicationContext();
ctx.register(SpringConfig.class);
return ctx;
}
}二、@ComponentScan
类型:类注解
属性:
- excludeFilters:排除扫描路径中加载的bean,需要指定类别(type)与具体项(classes)
- includeFilters:加载指定的bean,需要指定类别(type)与具体项(classes)
三、替换简单的初始化web容器方法:
去继承AbstractDispatcherServletInitializer的子类AbstractAnnotationConfigDispatcherServletInitializer:
package com.priv.config;

import org.springframework.web.context.WebApplicationContext;
import org.springframework.web.context.support.AnnotationConfigWebApplicationContext;
import org.springframework.web.servlet.support.AbstractAnnotationConfigDispatcherServletInitializer;
import org.springframework.web.servlet.support.AbstractDispatcherServletInitializer;

/**
 * @author : 十一
 * @data : 14:56 2022/12/25
 * When in doubt, use brute force.
 */
public class ServletContainersInitConfig extends AbstractAnnotationConfigDispatcherServletInitializer {

    @Override
    protected Class<?>[] getRootConfigClasses() {
        return new Class[]{SpringConfig.class};
    }

    @Override
    protected Class<?>[] getServletConfigClasses() {
        return new Class[]{SpringMvcConfig.class};
    }

    @Override
    protected String[] getServletMappings() {
        return new String[]{"/"};
    }
}
1.5PostMan
- Postman是一款功能强大的网页调试与发送网页HTTP请求的Chrome插件
- 作用:常用于进行接口测试
第二章 请求与响应
2.1请求映射路径
一、团队多人开发,每个人设置不同的请求路径,冲突问题如何解决?
设置模块名作为请求路径前缀
package com.priv.controller;

import org.springframework.stereotype.Controller;
import org.springframework.web.bind.annotation.RequestMapping;
import org.springframework.web.bind.annotation.ResponseBody;

/**
 * @author : 十一
 * @data : 12:10 2022/12/26
 * When in doubt, use brute force.
 */
@Controller
@RequestMapping("/book")
public class BookController {

    @RequestMapping("/save")
    @ResponseBody
    public String save(){
        System.out.println("book save ...");
        return "{'module' : 'springmvc'}";
    }
}
package com.priv.controller;
import org.springframework.stereotype.Controller;
import org.springframework.web.bind.annotation.RequestMapping;
import org.springframework.web.bind.annotation.ResponseBody;
/**
* @author : 十一
* @data : 17:10 2022/12/25
* When in doubt, use brute force.
*/
@Controller
@RequestMapping("/user")
public class UserController {
@RequestMapping("/save")
@ResponseBody
public String save(){
System.out.println("user save ...");
return "{'module' : 'springmvc'}";
}
@RequestMapping("/delete")
@ResponseBody
public String delete(){
System.out.println("user delete ...");
return "{'module' : 'springmvc'}";
}
}
- 名称:@RequestMapping
- 类型:方法注解 类注解
- 位置:SpringMVC控制器方法定义上方
- 作用:设置当前控制器方法请求访问路径,如果设置在类上统一设置当前控制器方法请求访问路径前缀
- 属性:value(默认):请求访问路径,或访问路径前缀
2.2请求参数
Get请求传参
- 普通参数:url地址传参,地址参数名与形参变量名相同,定义形参即可接收参数

Post请求参数
- 普通参数:form表单post请求传参,表单参数名与形参变量名相同,定义形参即可接收参数

package com.priv.controller;

import org.springframework.stereotype.Controller;
import org.springframework.web.bind.annotation.RequestMapping;
import org.springframework.web.bind.annotation.ResponseBody;

/**
 * @author : 十一
 * @data : 18:05 2022/12/26
 * When in doubt, use brute force.
 */
@Controller
public class UserController {

    @RequestMapping("/commonParam")
    @ResponseBody
    public String commonParam(String name, int age){
        System.out.println("普通参数传递 name ==> " + name);
        System.out.println("普通参数传递 age ==> " + age);
        return "'module' : 'common param'";
    }
}
乱码问题(Post请求)
- 为web容器添加过滤器并指定字符集,Spring-web包中提供了专用的字符过滤器
package com.priv.config;

import org.springframework.web.filter.CharacterEncodingFilter;
import org.springframework.web.servlet.support.AbstractAnnotationConfigDispatcherServletInitializer;

import javax.servlet.Filter;

/**
 * @author : 十一
 * @data : 18:06 2022/12/26
 * When in doubt, use brute force.
 */
public class ServletContainersInitConfig extends AbstractAnnotationConfigDispatcherServletInitializer {
    @Override
    protected Class<?>[] getRootConfigClasses() {
        return new Class[0];
    }

    @Override
    protected Class<?>[] getServletConfigClasses() {
        return new Class[]{SpringMvcConfig.class};
    }

    @Override
    protected String[] getServletMappings() {
        return new String[]{"/"};
    }

    /**
     * 乱码处理
     */
    @Override
    protected Filter[] getServletFilters() {
        CharacterEncodingFilter filter = new CharacterEncodingFilter();
        filter.setEncoding("UTF-8");
        return new Filter[]{filter};
    }
}
请求参数
- 普通参数
- 请求参数名与形参变量名不同,使用@RequestParam绑定参数关系
- POJO类型参数
- 请求参数名与形参对象属性名相同,定义POJO类型形参即可接收参数
- 嵌套POJO类型参数
- 请求参数名与形参对象属性名相同,按照对象层次结构关系即可接收嵌套POJO属性参数
- 数组类型参数
- 请求参数名与形参对象属性名相同且请求参数为多个,定义数组类型形参即可接收参数
- 集合类型参数
- 请求参数名与形参集合对象名相同且请求参数为多个,@RequestParam绑定参数关系
package com.priv.controller;

import com.priv.domain.User;
import org.springframework.stereotype.Controller;
import org.springframework.web.bind.annotation.RequestMapping;
import org.springframework.web.bind.annotation.RequestParam;
import org.springframework.web.bind.annotation.ResponseBody;

import java.util.Arrays;
import java.util.List;

/**
 * @author : 十一
 * @data : 18:05 2022/12/26
 * When in doubt, use brute force.
 */
@Controller
public class UserController {

    @RequestMapping("/commonParam")
    @ResponseBody
    public String commonParam(String name, int age){
        System.out.println("普通参数传递 name ==> " + name);
        System.out.println("普通参数传递 age ==> " + age);
        return "'module' : 'common param'";
    }

    /**
     * 普通参数:请求参数名与形参名不同
     */
    @RequestMapping("/commonParamDifferentName")
    @ResponseBody
    public String commonParamDifferentName(@RequestParam("name") String username, int age){
        System.out.println("普通参数传递 username ==> " + username);
        System.out.println("普通参数传递 age ==> " + age);
        return "'module' : 'common param different name'";
    }

    /**
     * POJO参数
     */
    @RequestMapping("/pojoParam")
    @ResponseBody
    public String pojoParam(User user){
        System.out.println("pojo参数传递 user ==> " + user);
        return "'module' : 'pojo param'";
    }

    /**
     * 嵌套POJO参数
     */
    @RequestMapping("/pojoContainPojoParam")
    @ResponseBody
    public String pojoContainPojoParam(User user){
        System.out.println("pojo嵌套pojo参数传递 user ==> " + user);
        return "'module' : 'pojo contain pojo param'";
    }

    /**
     * 数组参数
     */
    @RequestMapping("/arrayParam")
    @ResponseBody
    public String arrayParam(String[] likes){
        System.out.println("数组参数传递 likes ==> " + Arrays.toString(likes));
        return "'module' : 'array param'";
    }

    /**
     * 集合参数
     */
    @RequestMapping("/listParam")
    @ResponseBody
    public String listParam(@RequestParam List<String> likes){
        System.out.println("集合参数传递 likes ==> " + likes);
        return "'module' : 'list param'";
    }
}- 名称:@RequestParam
- 类型:形参注解
- 位置:SpringMVC控制器方法形参定义前面
- 作用:绑定请求参数与处理器方法形参间的关系
- 参数:
- required:是否为必传参数
- defaultValue:参数默认值


传递json数据
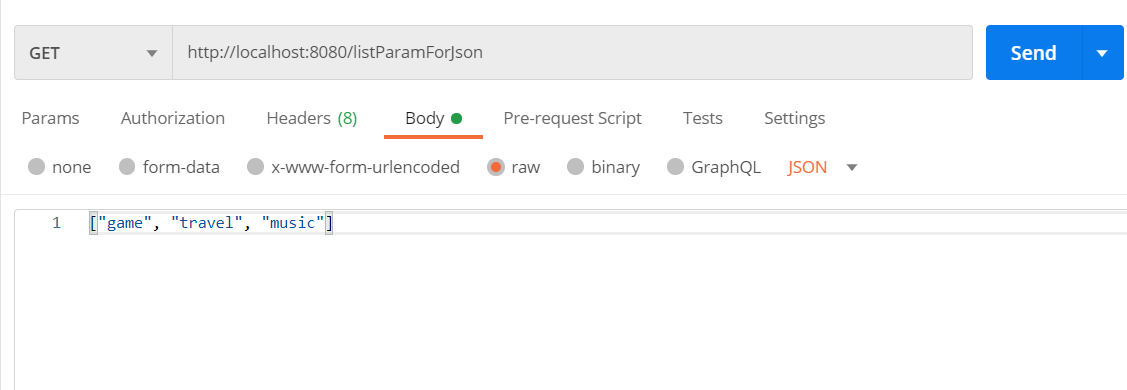
一、json数组
/**
 * 集合参数:json数据
 */
@RequestMapping("/listParamForJson")
@ResponseBody
public String listParamForJson(@RequestBody List<String> likes){
    System.out.println("list common(json)参数传递 list ==> " + likes);
    return "'module' : 'list common for json param'";
}
二、json对象(POJO)
json数据与形参对象属性名相同,定义POJO类型形参即可接收参数
/**
 * POJO参数:json数据
 */
@RequestMapping("/pojoParamForJson")
@ResponseBody
public String pojoParamForJson(@RequestBody User user){
    System.out.println("pojo(json)参数传递 user ==> " + user);
    return "'module' : 'pojo for json param'";
}
三、json数组(POJO)
json数组数据与集合泛型属性名相同,定义List类型形参即可接收参数
/**
 * 集合参数:json数据
 */
@RequestMapping("/listPojoParamForJson")
@ResponseBody
public String listPojoParamForJson(@RequestBody List<User> list){
    System.out.println("list pojo(json)参数传递 list ==> " + list);
    return "'module' : 'list pojo for json param'";
}
第一步:添加json数据转换相关坐标
<dependency>
    <groupId>com.fasterxml.jackson.core</groupId>
    <artifactId>jackson-databind</artifactId>
    <version>2.13.3</version>
</dependency>
第二步:设置发送json数据
第三步:开启自动转换json数据的支持
package com.priv.config;

import org.springframework.context.annotation.ComponentScan;
import org.springframework.context.annotation.Configuration;
import org.springframework.web.servlet.config.annotation.EnableWebMvc;

/**
 * @author : 十一
 * @data : 18:04 2022/12/26
 * When in doubt, use brute force.
 */
@Configuration
@ComponentScan("com.priv.controller")
@EnableWebMvc//开启自动转换json数据的支持
public class SpringMvcConfig {
}
第四步:设置接收json数据
@RequestBody
名称:@EnableWebMvc
类型:配置类注解
位置:SpringMVC配置类定义上方
作用:开启SpringMVC多项辅助功能
名称:@RequestBody
类型:形参注解
位置:SpringMVC控制器方法形参定义前面
作用:将请求中请求体所包含的数据传递给请求参数,此注解一个处理器方法只能使用一次
2.3日期类型参数传递
/**
* 日期参数
*/
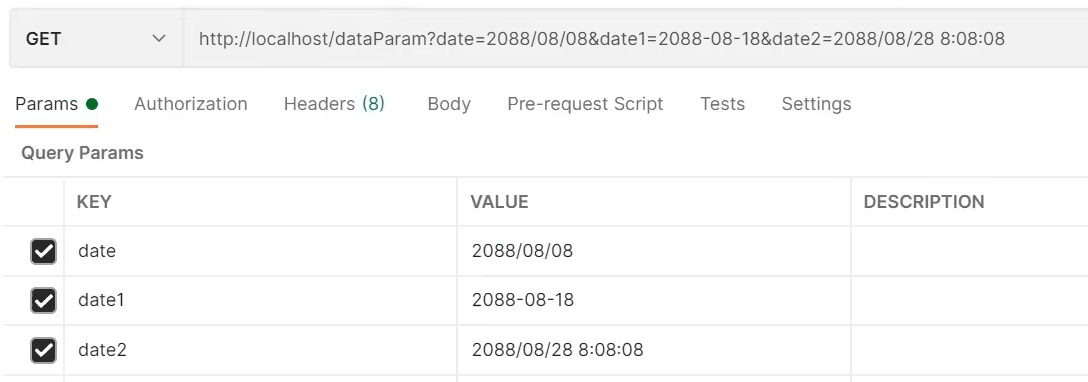
@RequestMapping("/date")
@ResponseBody
public String dateParam(Date date,
@DateTimeFormat(pattern = "yyyy-MM-dd") Date date1,
@DateTimeFormat(pattern = "yyyy/MM/dd HH:mm:ss") Date date2){
System.out.println("参数传递 date ==> " + date);
System.out.println("参数传递 date1(yyyy-MM-dd) ==> " + date1);
System.out.println("参数传递 date2(yyyy/MM/dd HH:mm:ss) ==> " + date2);
return "'module' : 'date param'";
}- 名称:@DateTimeFormat
- 类型:形参注解
- 位置:SpringMVC控制器方法形参前面
- 作用:设定日期时间型数据格式
- 属性:pattern:日期时间格式字符串
类型转换器
- Converter接口
public interface Converter<S, T>{
	@Nullable
	T convert(S source);
}
请求参数年龄数据(String -> Integer)
日期格式转换(String -> Date)
@EnableWebMvc功能之一:根据类型匹配对应的类型转换器
2.4响应json数据
package com.priv.controller;

import com.priv.domain.User;
import org.springframework.stereotype.Controller;
import org.springframework.web.bind.annotation.RequestMapping;
import org.springframework.web.bind.annotation.ResponseBody;

import java.util.ArrayList;
import java.util.List;

/**
 * @author : 十一
 * @data : 15:12 2022/12/27
 * When in doubt, use brute force.
 */
@Controller
public class UserController {

    /**
     * 响应页面 跳转页面
     */
    @RequestMapping("/toJumpPage")
    public String toJumpPage(){
        System.out.println("跳转页面");
        return "index.jsp";
    }

    /**
     * 响应文本数据
     */
    @RequestMapping("/toText")
    @ResponseBody
    public String toText(){
        System.out.println("返回纯文本数据");
        return "response text";
    }

    /**
     * 响应POJO对象
     */
    @RequestMapping("/toJsonPOJO")
    @ResponseBody
    public User toJsonPOJO(){
        System.out.println("返回json对象数据");
        User user = new User();
        user.setName("Jack");
        user.setAge(19);
        return user;
    }

    /**
     * 响应POJO集合对象
     */
    @RequestMapping("/toJsonList")
    @ResponseBody
    public List<User> toJsonList(){
        System.out.println("返回json集合数据");
        User user1 = new User();
        user1.setName("Java");
        user1.setAge(14);

        User user2 = new User();
        user2.setName("Go");
        user2.setAge(10);

        ArrayList<User> userList = new ArrayList<>();
        userList.add(user1);
        userList.add(user2);

        return userList;
    }
}
响应
- 名称:@ResponseBody
- 类型:方法注解
- 位置:SpringMVC控制器方法定义上方
- 作用:设置当前控制器返回值作为响应体
底层:HttpMessageConverter接口
//
// Source code recreated from a .class file by IntelliJ IDEA
// (powered by FernFlower decompiler)
//

package org.springframework.http.converter;

import java.io.IOException;
import java.util.Collections;
import java.util.List;
import org.springframework.http.HttpInputMessage;
import org.springframework.http.HttpOutputMessage;
import org.springframework.http.MediaType;
import org.springframework.lang.Nullable;

public interface HttpMessageConverter<T> {
    boolean canRead(Class<?> clazz, @Nullable MediaType mediaType);

    boolean canWrite(Class<?> clazz, @Nullable MediaType mediaType);

    List<MediaType> getSupportedMediaTypes();

    default List<MediaType> getSupportedMediaTypes(Class<?> clazz) {
        return !this.canRead(clazz, (MediaType)null) && !this.canWrite(clazz, (MediaType)null) ? Collections.emptyList() : this.getSupportedMediaTypes();
    }

    T read(Class<? extends T> clazz, HttpInputMessage inputMessage) throws IOException, HttpMessageNotReadableException;

    void write(T t, @Nullable MediaType contentType, HttpOutputMessage outputMessage) throws IOException, HttpMessageNotWritableException;
}
第三章 REST风格
3.1REST简介
REST(Representational State Transfer),表现形式状态转换
- 传统风格资源描述形式
http://localhost/user/getById?id=1
http://localhost/user/saveUser
- REST风格描述形式
优点:
- 隐藏资源的访问行为,无法通过地址得知对资源是何种操作
- 书写简化

- 根据REST风格对资源进行访问称为RESTful
tips:上述行为是约定方式,约定不是规范,可以打破,所以称为REST风格,而不是REST规范
描述模块的名称通常使用复数,也就是加s的格式描述,表示此类资源,而非单个资源,例如:users、books、accounts
3.2RESTful入门案例
设定http请求动作
设定请求参数(路径变量)
名称:@RequestMapping
类型:方法注解
位置:SpringMVC控制器方法定义上方
作用:设置当前控制器方法请求访问路径
属性:
- value:请求访问路径(默认)
- method:http请求动作,标准动作(GET/POST/PUT/DELETE)
名称:@PathVariable
类型:形参注解
位置:SpringMVC控制器方法形参定义前面
作用:绑定路径参数与处理器方法形参间的关系,要求路径参数名与形参名一一对应
package com.priv.controller;

import com.priv.domain.User;
import org.springframework.stereotype.Controller;
import org.springframework.web.bind.annotation.*;

/**
 * @author : 十一
 * @data : 20:19 2022/12/27
 * When in doubt, use brute force.
 */
@Controller
public class UserController {

    @RequestMapping(value = "/users", method = RequestMethod.POST)
    @ResponseBody
    public String save(){
        System.out.println("user save...");
        return "{'module' : 'user save'}";
    }

    @RequestMapping(value = "/users/{id}", method = RequestMethod.DELETE)
    @ResponseBody
    public String delete(@PathVariable Integer id){
        System.out.println("user delete..." + id);
        return "{'module' : 'user delete'}";
    }

    @RequestMapping(value = "/users", method = RequestMethod.PUT)
    @ResponseBody
    public String update(@RequestBody User user){
        System.out.println("user update..." + user);
        return "{'module' : 'user update'}";
    }

    @RequestMapping(value = "/users/{id}", method = RequestMethod.GET)
    @ResponseBody
    public String getById(@PathVariable Integer id){
        System.out.println("user getById..." + id);
        return "{'module' : 'user getById'}";
    }

    @RequestMapping(value = "/users", method = RequestMethod.GET)
    @ResponseBody
    public String getAll(){
        System.out.println("user getAll...");
        return "{'module' : 'user getAll'}";
    }

}
3.3REST快速开发
名称:@RestController
类型:类注解
位置:基于SpringMVC的RESTful开发控制器类定义上方
作用:设置当前控制器类为RESTful风格,等同于@Controller与@ResponseBody两个注解组合功能
名称:@GetMapping @PostMapping @PutMapping @DeleteMapping
package com.priv.controller;

import com.priv.domain.User;
import org.springframework.web.bind.annotation.*;

/**
 * @author : 十一
 * @data : 20:46 2022/12/27
 * When in doubt, use brute force.
 */
@RestController
@RequestMapping("/books")
public class BookController {

    @PostMapping
    public String save(){
        System.out.println("book save...");
        return "{'module' : 'book save'}";
    }

    @DeleteMapping("/{id}")
    public String delete(@PathVariable Integer id){
        System.out.println("book delete..." + id);
        return "{'module' : 'book delete'}";
    }

    @PutMapping
    public String update(@RequestBody User user){
        System.out.println("book update..." + user);
        return "{'module' : 'book update'}";
    }

    @GetMapping("/{id}")
    public String getById(@PathVariable Integer id){
        System.out.println("book getById..." + id);
        return "{'module' : 'book getById'}";
    }

    @GetMapping
    public String getAll(){
        System.out.println("book getAll...");
        return "{'module' : 'book getAll'}";
    }
}
tips:当访问静态资源时,SpringMVC会进行拦截,需要配置资源放行,交给Tomcat去处理
package com.priv.config;

import org.springframework.context.annotation.Configuration;
import org.springframework.web.servlet.config.annotation.ResourceHandlerRegistry;
import org.springframework.web.servlet.config.annotation.WebMvcConfigurationSupport;

/**
 * @author : 十一
 * @data : 21:03 2022/12/27
 * When in doubt, use brute force.
 */
@Configuration
public class SpringMvcSupport extends WebMvcConfigurationSupport {
    @Override
    protected void addResourceHandlers(ResourceHandlerRegistry registry) {
        registry.addResourceHandler("/pages/**","/pages/");
        registry.addResourceHandler("/js/**","/js/");
        registry.addResourceHandler("/css/**","/css/");
        registry.addResourceHandler("/plugins/**","/plugins/");
    }
}
第四章 SSM整合
4.1SSM整合
SSM整合流程
1、创建工程
2、SSM整合
- Spring
- SpringConfig
- Mybatis
- MybatisConfig
- JdbcConfig
- jdbc.properties
- SpringMVC
- ServletConfig
- SpringMvcConfig
3、功能模块
- 表与实体类
- dao(接口+自动代理)
- service(接口+实现类)
- 业务层接口测试(整合JUnit)
- controller
- 表现层接口测试(PostMan)
Spring整合MyBatis
- 配置
- SpringConfig
- JdbcConfig、jdbc.properties
- MyBatisConfig
- 模型
- Book
- 数据层标准开发
- BookDao
- 业务层标准开发
- BookService
- BookServiceImpl
- 测试接口
- BookServiceTest
- 事务处理
Spring整合SpringMVC
- web配置类
- SpringMVC配置类
- 基于Restful的Controller开发
4.2表现层数据封装
前端接收数据格式:
创建结果模型类,封装数据到data属性中
封装操作结果到code属性中
封装特殊消息到message(msg)属性中
设置统一数据返回结果类
public class Result{
	private Object data;
	private Integer code;
	private String msg;
}
tips:Result类中的字段并不是固定的,可以根据需要自行增减,提供若干个构造方法,方便操作
- 设置统一数据返回结果编码
package com.priv.controller;

/**
 * @author : 十一
 * @data : 17:56 2022/12/28
 * When in doubt, use brute force.
 */
public class Code {
    public static final Integer SAVE_OK = 20011;
    public static final Integer DELETE_OK = 20021;
    public static final Integer UPDATE_OK = 20031;
    public static final Integer GET_OK = 20041;

    public static final Integer SAVE_ERR = 20010;
    public static final Integer DELETE_ERR = 20020;
    public static final Integer UPDATE_ERR = 20030;
    public static final Integer GET_ERR = 20040;
}- 根据情况设定合理的Result
package com.priv.controller;

import com.priv.domain.Book;
import com.priv.service.BookService;
import org.springframework.beans.factory.annotation.Autowired;
import org.springframework.web.bind.annotation.*;

import java.util.List;

/**
 * @author : 十一
 * @data : 13:06 2022/12/28
 * When in doubt, use brute force.
 */
@RestController
@RequestMapping("/books")
public class BookController {

    @Autowired
    private BookService bookService;

    @PostMapping
    public Result save(@RequestBody Book book) {
        boolean flag = bookService.save(book);
        return new Result(flag ? Code.SAVE_OK : Code.SAVE_ERR, flag);
    }

    @PutMapping
    public Result update(@RequestBody Book book) {
        boolean flag = bookService.update(book);
        return new Result(flag ? Code.UPDATE_OK : Code.UPDATE_ERR, flag);
    }

    @DeleteMapping("/{id}")
    public Result delete(@PathVariable Integer id) {
        boolean flag = bookService.delete(id);
        return new Result(flag ? Code.DELETE_OK : Code.DELETE_ERR, flag);
    }

    @GetMapping("/{id}")
    public Result findById(@PathVariable Integer id) {
        Book book = bookService.findById(id);
        Integer code = book != null ? Code.GET_OK : Code.GET_ERR;
        String msg = book != null ? "" : "数据查询失败,请重试!";
        return new Result(code, book, msg);
    }

    @GetMapping
    public Result findAll() {
        List<Book> bookList = bookService.findAll();
        Integer code = bookList != null ? Code.GET_OK : Code.GET_ERR;
        String msg = bookList != null ? "" : "数据查询失败,请重试!";
        return new Result(code, bookList, msg);
    }
}
4.3异常处理器
- 程序开发过程中不可避免的会遇到异常现象
出现异常现象的常见位置与常见诱因如下:
- 框架内部抛出的异常:因使用不合规导致
- 数据层抛出的异常:因外部服务器故障导致(例如:服务器超时访问)
- 业务层抛出的异常:因业务逻辑书写错误导致(例如:遍历业务书写操作,导致索引异常等)
- 表现层抛出的异常:因数据收集、校验等规则导致(例如:不匹配的数据类型间导致异常)
- 工具类抛出的异常:因工具类书写不严谨不够健壮导致(例如:必要释放的连接长期未释放等)
一、各个层级均出现异常,异常处理代码书写在哪一层?
所有的异常均抛出到表现层进行处理
二、表现层处理异常,每个方法单独书写,代码书写量巨大且意义不强,如何解决?
AOP思想
异常处理器
- 集中的、统一的处理项目中出现的异常
package com.priv.controller;

import org.springframework.web.bind.annotation.ExceptionHandler;
import org.springframework.web.bind.annotation.RestControllerAdvice;

/**
 * @author : 十一
 * @data : 18:39 2022/12/28
 * When in doubt, use brute force.
 */
@RestControllerAdvice
public class ProjectExceptionAdvice {
    @ExceptionHandler(Exception.class)
    public Result doException(Exception exception){
        System.out.println("出现异常");
        return new Result(666, null);
    }
}
名称:@RestControllerAdvice
类型:类注解
位置:Rest风格开发的控制器增强类定义上方
作用:为Rest风格开发的控制器类做增强
说明:此注解自带@ResponseBody注解与@Component注解,具备对应的功能
名称:@ExceptionHandler
类型:方法注解
位置:专用于异常处理的控制器方法上方
作用:设置指定异常的处理方案,功能等同于控制器方法,出现异常后终止原始控制器执行,并转入当前方法执行
说明:此类方法可以根据处理的异常不同,制作多个方法分别处理对应的异常
4.4项目异常处理方案
- 项目异常分类
- 业务异常(BusinessException):规范的用户行为产生的异常,不规范的用户行为操作产生的异常
- 发送对应消息传递给用户,提醒规范操作
- 系统异常(SystemException):项目运行过程中可预计且无法避免的异常
- 发送固定消息传递给用户,安抚用户
- 发送特定消息给运维人员,提醒维护
- 记录日志
- 其他异常(Exception):编程任意未预期到的异常
- 发送固定消息传递给用户,安抚用户
- 发送特定消息给编程人员,提醒维护(纳入预期范围内)
- 记录日志
- 业务异常(BusinessException):规范的用户行为产生的异常,不规范的用户行为操作产生的异常
自定义项目系统级异常
package com.priv.exception;

/**
 * @author : 十一
 * @data : 21:13 2022/12/28
 * When in doubt, use brute force.
 */
public class SystemException extends RuntimeException{

    private Integer code;

    public Integer getCode() {
        return code;
    }

    public void setCode(Integer code) {
        this.code = code;
    }

    /**
     * Constructs a new runtime exception with the specified detail message.
     * The cause is not initialized, and may subsequently be initialized by a
     * call to {@link #initCause}.
     *
     * @param message the detail message. The detail message is saved for
     *                later retrieval by the {@link #getMessage()} method.
     */
    public SystemException(Integer code, String message) {
        super(message);
        this.code = code;
    }

    /**
     * Constructs a new runtime exception with the specified detail message and
     * cause.  <p>Note that the detail message associated with
     * {@code cause} is <i>not</i> automatically incorporated in
     * this runtime exception's detail message.
     *
     * @param message the detail message (which is saved for later retrieval
     *                by the {@link #getMessage()} method).
     * @param cause   the cause (which is saved for later retrieval by the
     *                {@link #getCause()} method).  (A {@code null} value is
     *                permitted, and indicates that the cause is nonexistent or
     *                unknown.)
     * @since 1.4
     */
    public SystemException(Integer code, String message, Throwable cause) {
        super(message, cause);
        this.code = code;
    }

}
自定义项目业务级异常
package com.priv.exception;

/**
 * @author : 十一
 * @data : 21:16 2022/12/28
 * When in doubt, use brute force.
 */
public class BusinessException extends RuntimeException{
    private Integer code;

    public Integer getCode() {
        return code;
    }

    public void setCode(Integer code) {
        this.code = code;
    }

    /**
     * Constructs a new runtime exception with the specified detail message.
     * The cause is not initialized, and may subsequently be initialized by a
     * call to {@link #initCause}.
     *
     * @param message the detail message. The detail message is saved for
     *                later retrieval by the {@link #getMessage()} method.
     */
    public BusinessException(Integer code, String message) {
        super(message);
        this.code = code;
    }

    /**
     * Constructs a new runtime exception with the specified detail message and
     * cause.  <p>Note that the detail message associated with
     * {@code cause} is <i>not</i> automatically incorporated in
     * this runtime exception's detail message.
     *
     * @param message the detail message (which is saved for later retrieval
     *                by the {@link #getMessage()} method).
     * @param cause   the cause (which is saved for later retrieval by the
     *                {@link #getCause()} method).  (A {@code null} value is
     *                permitted, and indicates that the cause is nonexistent or
     *                unknown.)
     * @since 1.4
     */
    public BusinessException(Integer code, String message, Throwable cause) {
        super(message, cause);
        this.code = code;
    }
}
自定义异常编码
package com.priv.controller;

/**
 * @author : 十一
 * @data : 17:56 2022/12/28
 * When in doubt, use brute force.
 */
public class Code {
    public static final Integer SAVE_OK = 20011;
    public static final Integer DELETE_OK = 20021;
    public static final Integer UPDATE_OK = 20031;
    public static final Integer GET_OK = 20041;

    public static final Integer SAVE_ERR = 20010;
    public static final Integer DELETE_ERR = 20020;
    public static final Integer UPDATE_ERR = 20030;
    public static final Integer GET_ERR = 20040;

    public static final Integer SYSTEM_ERR = 50001;
    public static final Integer SYSTEM_TIMEOUT_ERR = 50002;
    public static final Integer SYSTEM_UNKNOW_ERR = 59999;
    public static final Integer BUSINESS_ERR = 60002;
}
触发自定义异常
package com.priv.service.impl;

import com.priv.controller.Code;
import com.priv.dao.BookDao;
import com.priv.domain.Book;
import com.priv.exception.BusinessException;
import com.priv.exception.SystemException;
import com.priv.service.BookService;
import org.springframework.beans.factory.annotation.Autowired;
import org.springframework.stereotype.Service;

import java.util.List;

/**
 * @author : 十一
 * @data : 13:05 2022/12/28
 * When in doubt, use brute force.
 */
@Service
public class BookServiceImpl implements BookService {

    @Autowired
    private BookDao bookDao;
    /**
     * 按id查询
     *
     * @param id
     * @return
     */
    public Book findById(Integer id) {
        if (id == 1){
            throw new BusinessException(Code.BUSINESS_ERR,"出异常了!");
        }
        try {
            int i = 1/0;
        }catch (Exception e){
            throw new SystemException(Code.SYSTEM_TIMEOUT_ERR,"服务器访问超时,请重试!",e);
        }

        return bookDao.findById(id);
    }
}
拦截并处理异常
package com.priv.controller;

import com.priv.exception.BusinessException;
import com.priv.exception.SystemException;
import org.springframework.web.bind.annotation.ExceptionHandler;
import org.springframework.web.bind.annotation.RestControllerAdvice;

/**
 * @author : 十一
 * @data : 18:39 2022/12/28
 * When in doubt, use brute force.
 */
@RestControllerAdvice
public class ProjectExceptionAdvice {

    @ExceptionHandler(SystemException.class)
    public Result doSystemException(SystemException exception){
        /**
         * 记录日志
         * 发送消息给运维
         * 发送邮件给开发人员,exception对象发送给开发人员
         */
        return new Result(exception.getCode(), null, exception.getMessage());
    }


    @ExceptionHandler(BusinessException.class)
    public Result doBusinessException(BusinessException exception){
        return new Result(exception.getCode(), null, exception.getMessage());
    }


    @ExceptionHandler(Exception.class)
    public Result doException(Exception exception){
        /**
         * 记录日志
         * 发送消息给运维
         * 发送邮件给开发人员,exception对象发送给开发人员
         */
        return new Result(Code.SYSTEM_UNKNOW_ERR, null, "系统繁忙,请稍后再试!");
    }
}
4.5案例:SSM整合标准开发
methods: {
    //列表
    getAll() {
        axios.get("/books").then((res)=>{
            this.dataList = res.data.data;
        });
    },

    //弹出添加窗口
    handleCreate() {
        this.dialogFormVisible = true;
        this.resetForm();
    },

    //重置表单
    resetForm() {
        this.formData = {};
    },

    //添加
    handleAdd () {
        axios.post("/books",this.formData).then((res)=>{
            if (res.data.code == 20011){
                this.dialogFormVisible = false;
                this.$message.success("添加成功");
            }else if (res.data.code == 20010){
                this.$message.error("添加失败");
            }else {
                this.$message.error(res.data.msg);
            }
        }).finally(()=>{
           this.getAll();
        });
    },

    //弹出编辑窗口
    handleUpdate(row) {
        axios.get("/books/" + row.id).then((res)=>{
            if (res.data.code == 20041){
                this.formData = res.data.data;
                this.dialogFormVisible4Edit = true;
            }else {
                this.$message.error(res.data.msg);
            }

        });
    },

    //编辑
    handleEdit() {
        axios.put("/books",this.formData).then((res)=>{
            if (res.data.code == 20031){
                this.dialogFormVisible4Edit = false;
                this.$message.success("修改成功");
            }else if (res.data.code == 20030){
                this.$message.error("修改失败");
            }else {
                this.$message.error(res.data.msg);
            }
        }).finally(()=>{
            this.getAll();
        });
    },

    // 删除
    handleDelete(row) {
        this.$confirm("此操作永久删除当前数据,是否继续?", "提示", {
            type: 'info'
        }).then(()=>{
            axios.delete("/books/" + row.id).then((res)=>{
                if (res.data.code == 20021){
                    this.$message.success("删除成功");
                }else {
                    this.$message.error("删除失败");
                }
            }).finally(()=>{
                this.getAll();
            });
        }).catch(()=>{
            this.$message.info("取消删除操作");
        });
    }
}
第五章 拦截器
5.1拦截器概念

拦截器(Interceptor):是一种动态拦截方法调用的机制,在SpringMVC中动态拦截控制器方法的执行
作用:
- 在指定的方法调用前后执行预先设定的代码
- 阻止原始方法的执行
拦截器与过滤器的区别
- 归属不同:Filter属于Servlet技术,Interceptor属于SpringMVC技术
- 拦截内容不同:Filter对所有访问进行增强,Interceptor仅针对SpringMVC的访问进行增强
5.2入门案例
- 声明拦截器的bean,并实现HandlerInterceptor接口(注意:扫描加载bean)
package com.priv.controller.interceptor;

import org.springframework.stereotype.Component;
import org.springframework.web.servlet.HandlerInterceptor;
import org.springframework.web.servlet.ModelAndView;

import javax.servlet.http.HttpServletRequest;
import javax.servlet.http.HttpServletResponse;

/**
 * @author : 十一
 * @data : 22:54 2022/12/28
 * When in doubt, use brute force.
 */
@Component
public class ProjectInterceptor implements HandlerInterceptor {
    @Override
    public boolean preHandle(HttpServletRequest request, HttpServletResponse response, Object handler) throws Exception {
        System.out.println("preHandle...");
        /**
         * 是否终止原始操作
         * false:终止
         * true:不终止
         */
        return true;
    }

    @Override
    public void postHandle(HttpServletRequest request, HttpServletResponse response, Object handler, ModelAndView modelAndView) throws Exception {
        System.out.println("postHandle...");
    }

    @Override
    public void afterCompletion(HttpServletRequest request, HttpServletResponse response, Object handler, Exception ex) throws Exception {
        System.out.println("afterCompletion...");
    }
}- 定义配置类,继承WebMvcConfigurationSupport,实现addInterceptor方法(注意:扫描加载配置)
- 添加拦截器并设定拦截的访问路径,路径可以通过可变参数设置多个
package com.priv.config;

import com.priv.controller.interceptor.ProjectInterceptor;
import org.springframework.beans.factory.annotation.Autowired;
import org.springframework.context.annotation.Configuration;
import org.springframework.web.servlet.config.annotation.InterceptorRegistry;
import org.springframework.web.servlet.config.annotation.ResourceHandlerRegistry;
import org.springframework.web.servlet.config.annotation.WebMvcConfigurationSupport;

/**
 * @author : 十一
 * @data : 21:03 2022/12/27
 * When in doubt, use brute force.
 */
@Configuration
public class SpringMvcSupport extends WebMvcConfigurationSupport {

    @Autowired
    private ProjectInterceptor projectInterceptor;

    @Override
    protected void addResourceHandlers(ResourceHandlerRegistry registry) {
        registry.addResourceHandler("/pages/**").addResourceLocations("/pages/");
    }

    @Override
    protected void addInterceptors(InterceptorRegistry registry) {
        registry.addInterceptor(projectInterceptor).addPathPatterns("/books", "/books/*");
    }
}- 使用标准接口WebMvcConfigurer简化开发(注意:侵入式较强)
package com.priv.config;

import com.priv.controller.interceptor.ProjectInterceptor;
import org.springframework.beans.factory.annotation.Autowired;
import org.springframework.context.annotation.ComponentScan;
import org.springframework.context.annotation.Configuration;
import org.springframework.web.servlet.config.annotation.EnableWebMvc;
import org.springframework.web.servlet.config.annotation.InterceptorRegistry;
import org.springframework.web.servlet.config.annotation.WebMvcConfigurer;

/**
 * @author : 十一
 * @data : 22:51 2022/12/28
 * When in doubt, use brute force.
 */
@Configuration
@ComponentScan("com.priv.controller")
@EnableWebMvc
public class SpringMvcConfig implements WebMvcConfigurer {
    @Autowired
    private ProjectInterceptor projectInterceptor;

    @Override
    public void addInterceptors(InterceptorRegistry registry) {
        registry.addInterceptor(projectInterceptor).addPathPatterns("/books", "/books/*");
    }
}
执行流程
5.3拦截器参数
- 前置处理
@Override
public boolean preHandle(HttpServletRequest request, HttpServletResponse response, Object handler) throws Exception {
    System.out.println("preHandle...");
    /**
     * 是否终止原始操作
     * false:终止
     * true:不终止
     */
    return true;
}
参数:
- request:请求对象
- response:响应对象
- handler:被调用的处理器对象,本质上是一个方法对象,对反射技术中的Method对象进行了再包装
返回值
- 返回值为false,被拦截的处理器将不执行
后置处理
@Override
public void postHandle(HttpServletRequest request, HttpServletResponse response, Object handler, ModelAndView modelAndView) throws Exception {
    System.out.println("postHandle...");
}
参数:
- modelAndView:如果处理器执行完成具有返回结果,可以读取到对应数据与页面信息,并进行调整
完成后处理
@Override
public void afterCompletion(HttpServletRequest request, HttpServletResponse response, Object handler, Exception ex) throws Exception {
    System.out.println("afterCompletion...");
}- 参数:
- ex:如果处理器执行过程中出现异常对象,可以针对异常情况单独处理
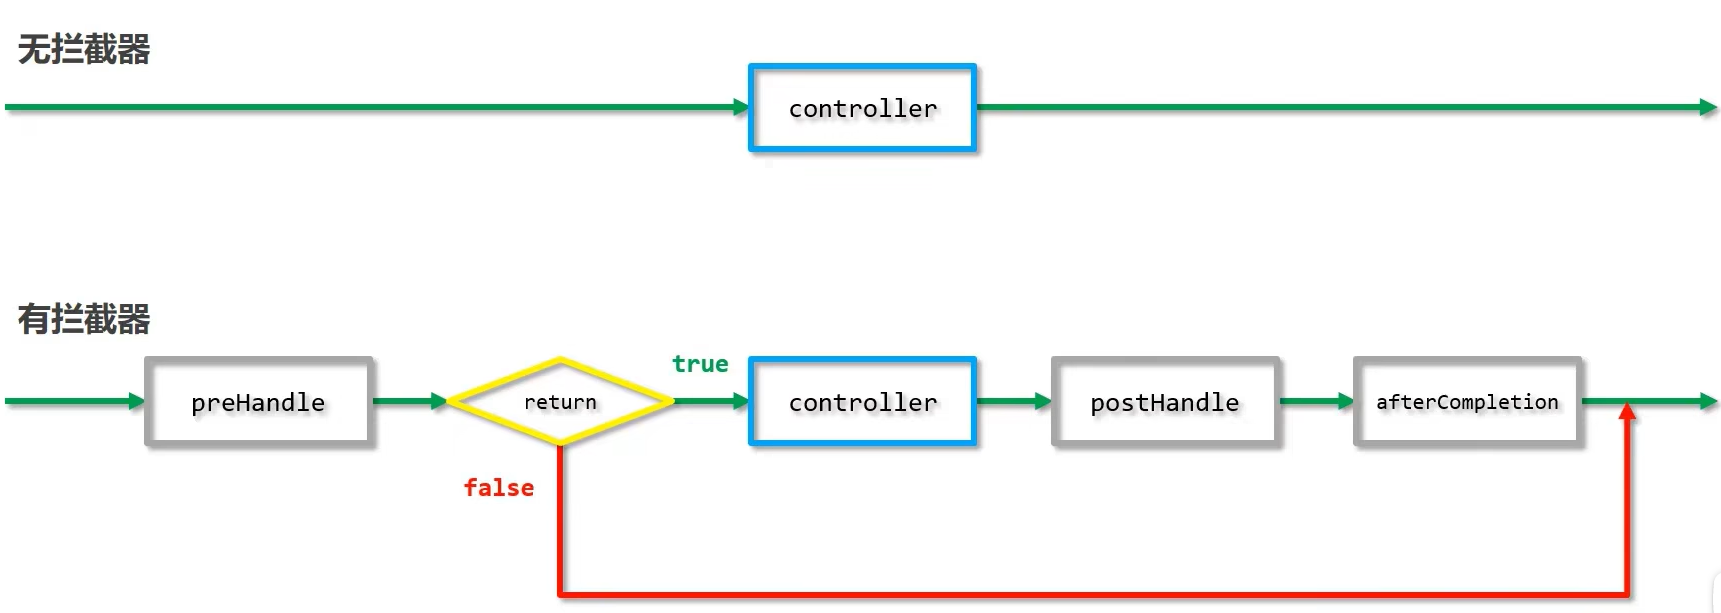
5.4拦截器工作流程分析
多拦截器执行顺序
- 当配置多个拦截器时,形成拦截器链
- 拦截器链的运行顺序参照拦截器添加顺序为准
- 当拦截器中出现对原始处理器的拦截,后面的拦截器均终止运行
- 当拦截器运行中断,仅运行配置在前面的拦截器的afterCompletion操作

拦截器链的运行顺序
- preHandle:与配置顺序相同,必定运行
- postHandle:与配置顺序相反,可能不运行
- afterCompletion:与配置顺序相反,可能不运行
小结
相关源码请查看gitee仓库